Quantcast
Channel: Rustic Maple
Viewing all 211 articles
Browse latest View live

Our 2014 Cozy Christmas Home Tour

$
0
0
Link party holiday house walk tag

Hello friends! Welcome to our Christmas 2014 Home Tour. I'm joining The 2014 Holiday House Walk Link Party at Jennifer Rizzo's. Christmas and Home Tours are two of my favourite things. I loved visiting the homes in this year's tour and found the homes and bloggers to be very welcoming. There was so much inspiration that I know, just like in previous years, that I will be visiting the tours again and again. 


I am so happy that you are visiting our home tour today. I welcome my regular readers and thank you for your friendship. If you are a new visitor, I am Elizabeth and I live with my husband Rob and our two teenage sons in our suburban home in southern Ontario, Canada. I will be sharing lots of photos, with links to detailed posts as they are available. 


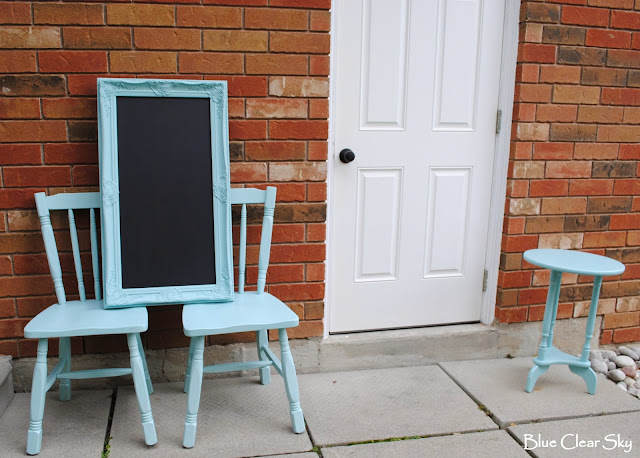
We will start the tour on the front porch on the first sunny day in weeks. It is cold here and we have had light snow a few times. I kept things really simple on the front porch this year.


We put the wicker chairs away for the winter and I placed a metal pail on a bench and filled it with fresh fir and pine clippings, cedar branches and a simple burlap bow.


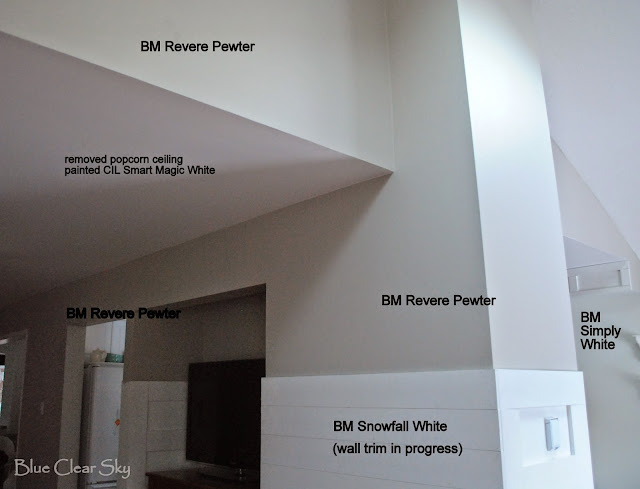
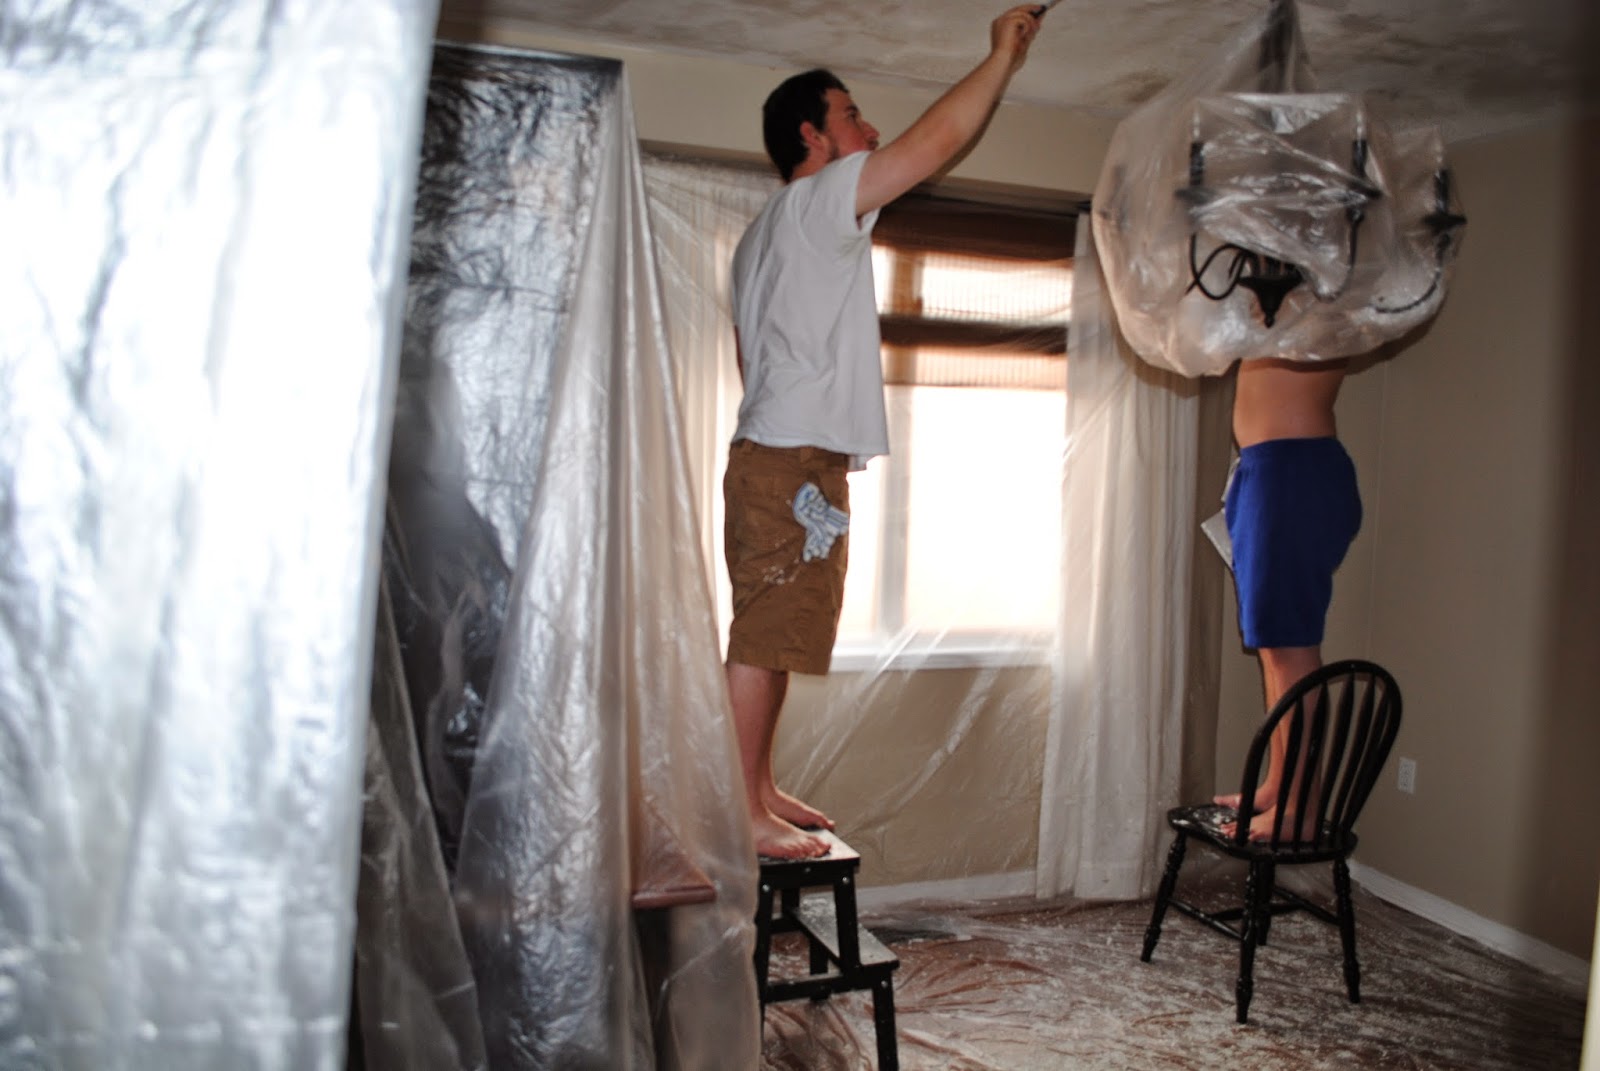
I got a late start to my Christmas decorating this year because I just finished painting our main level. Lots of work putting everything back together but we love the fresh new colours. We have plans to make more updates., but I like the way that our home's style is evolving as time and money allows.


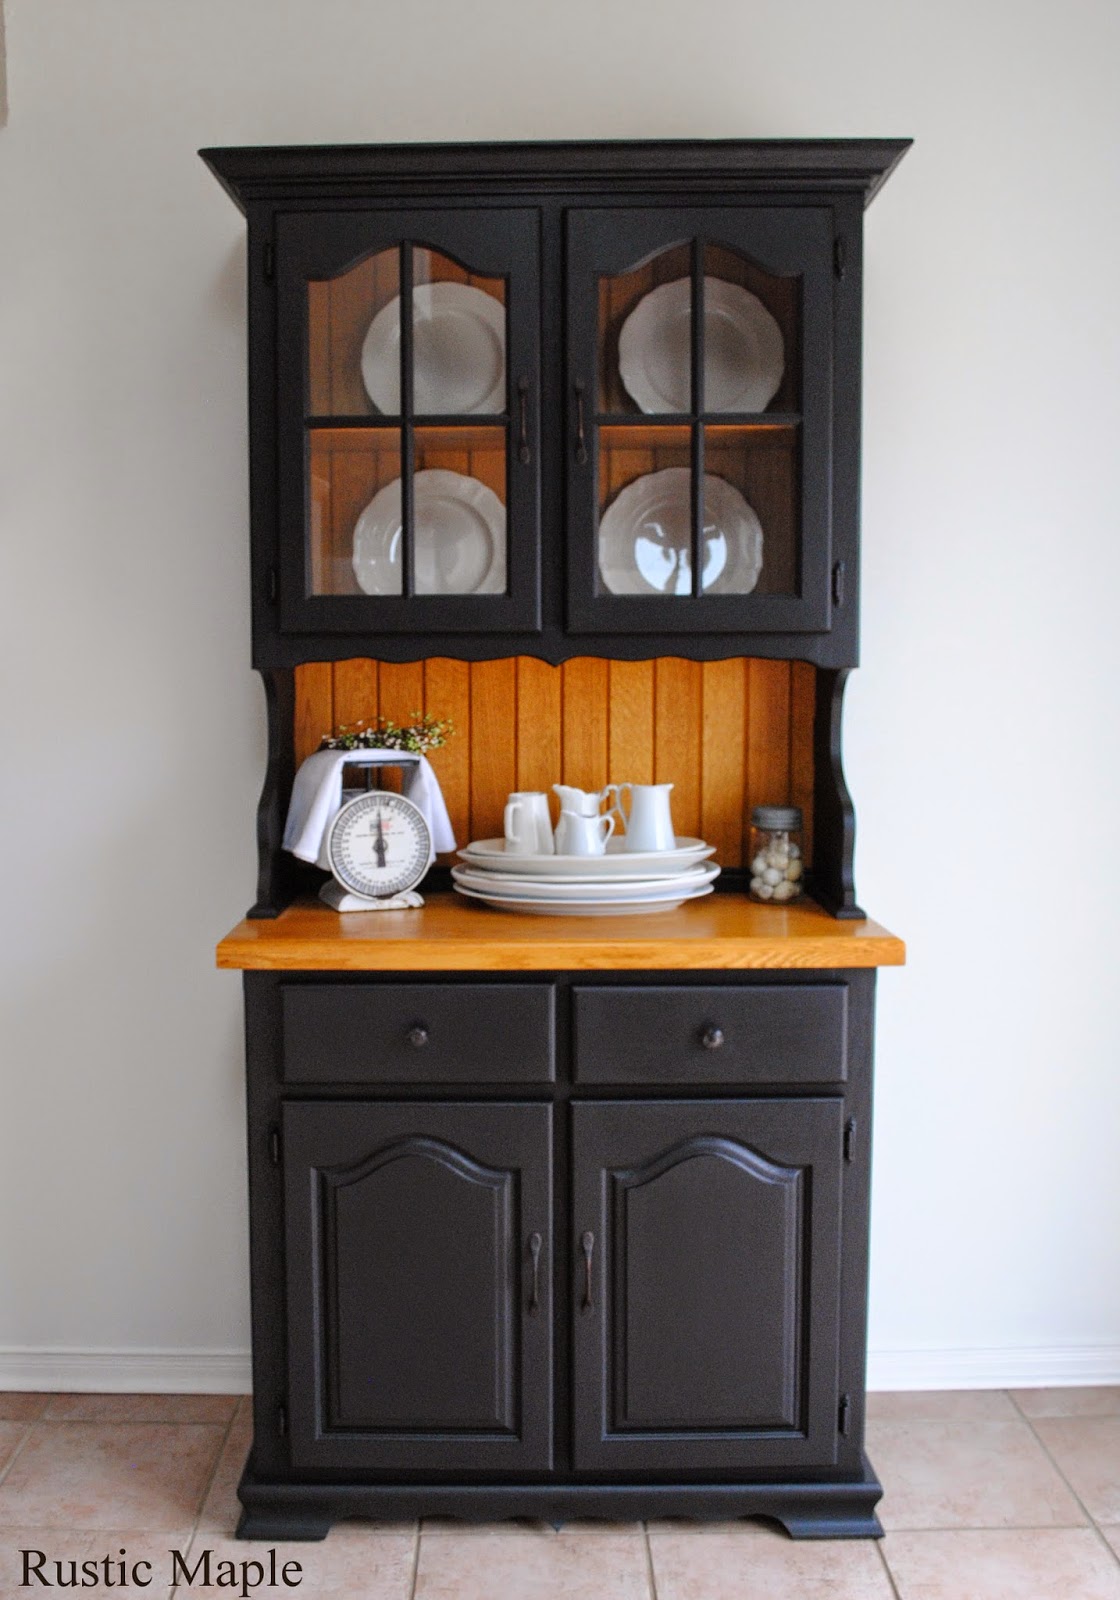
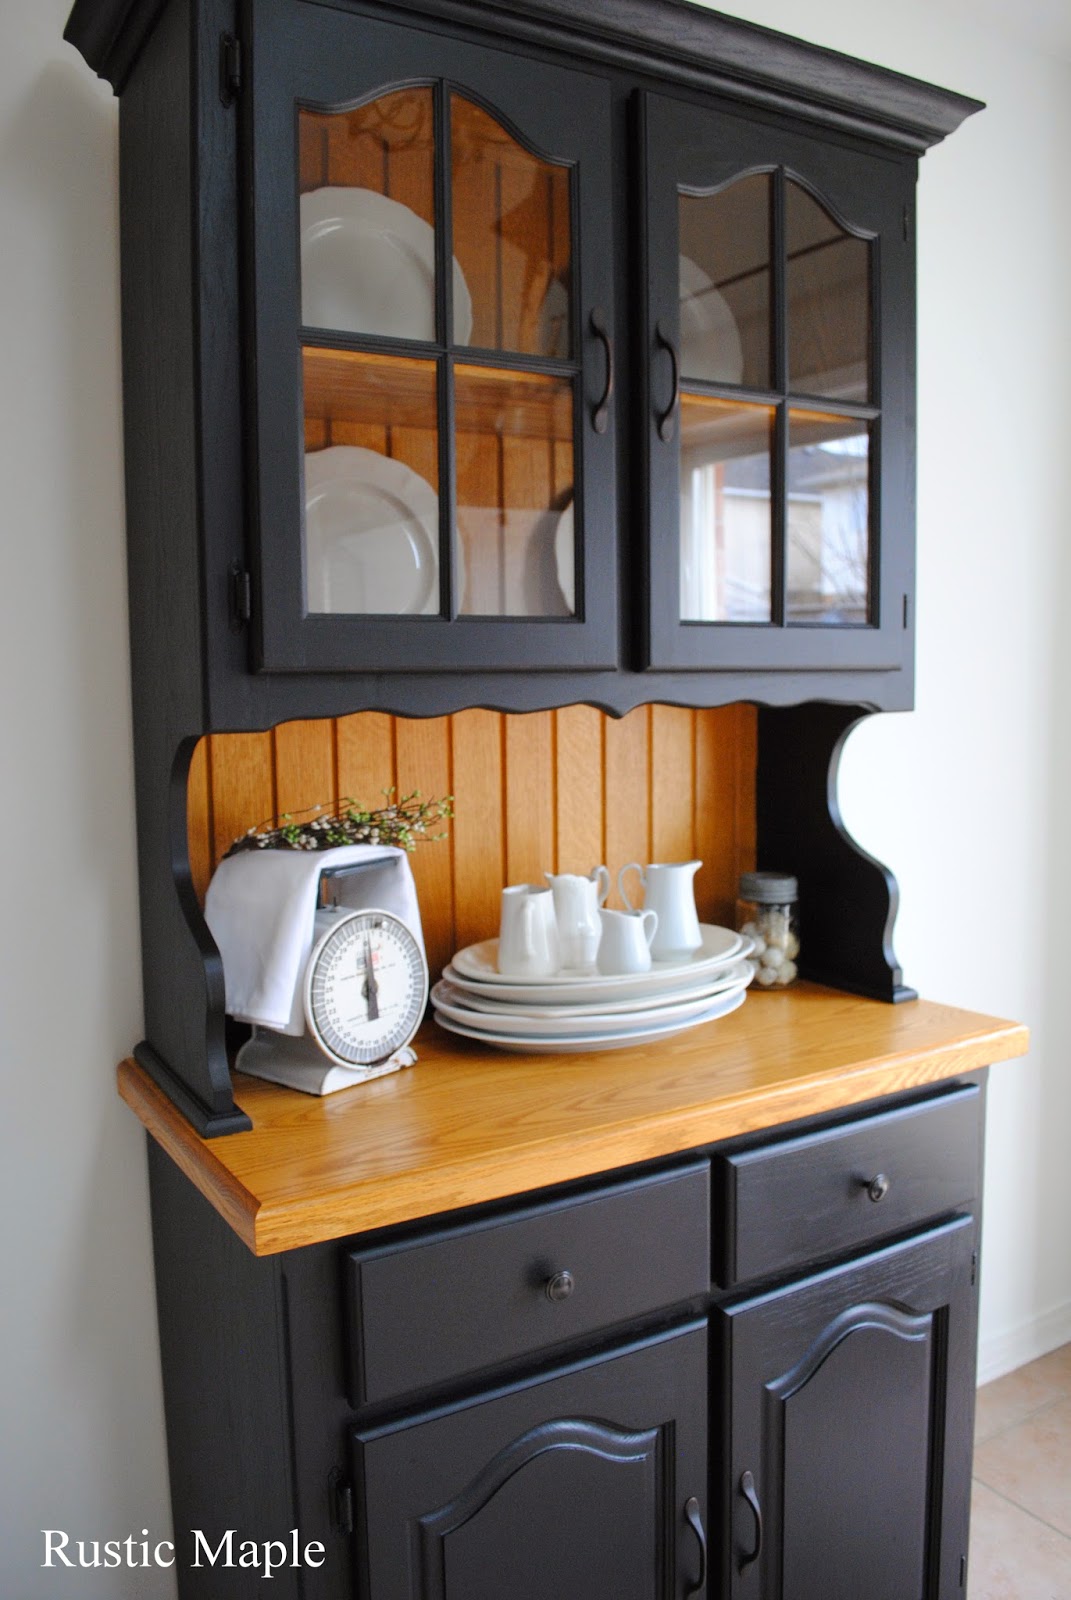
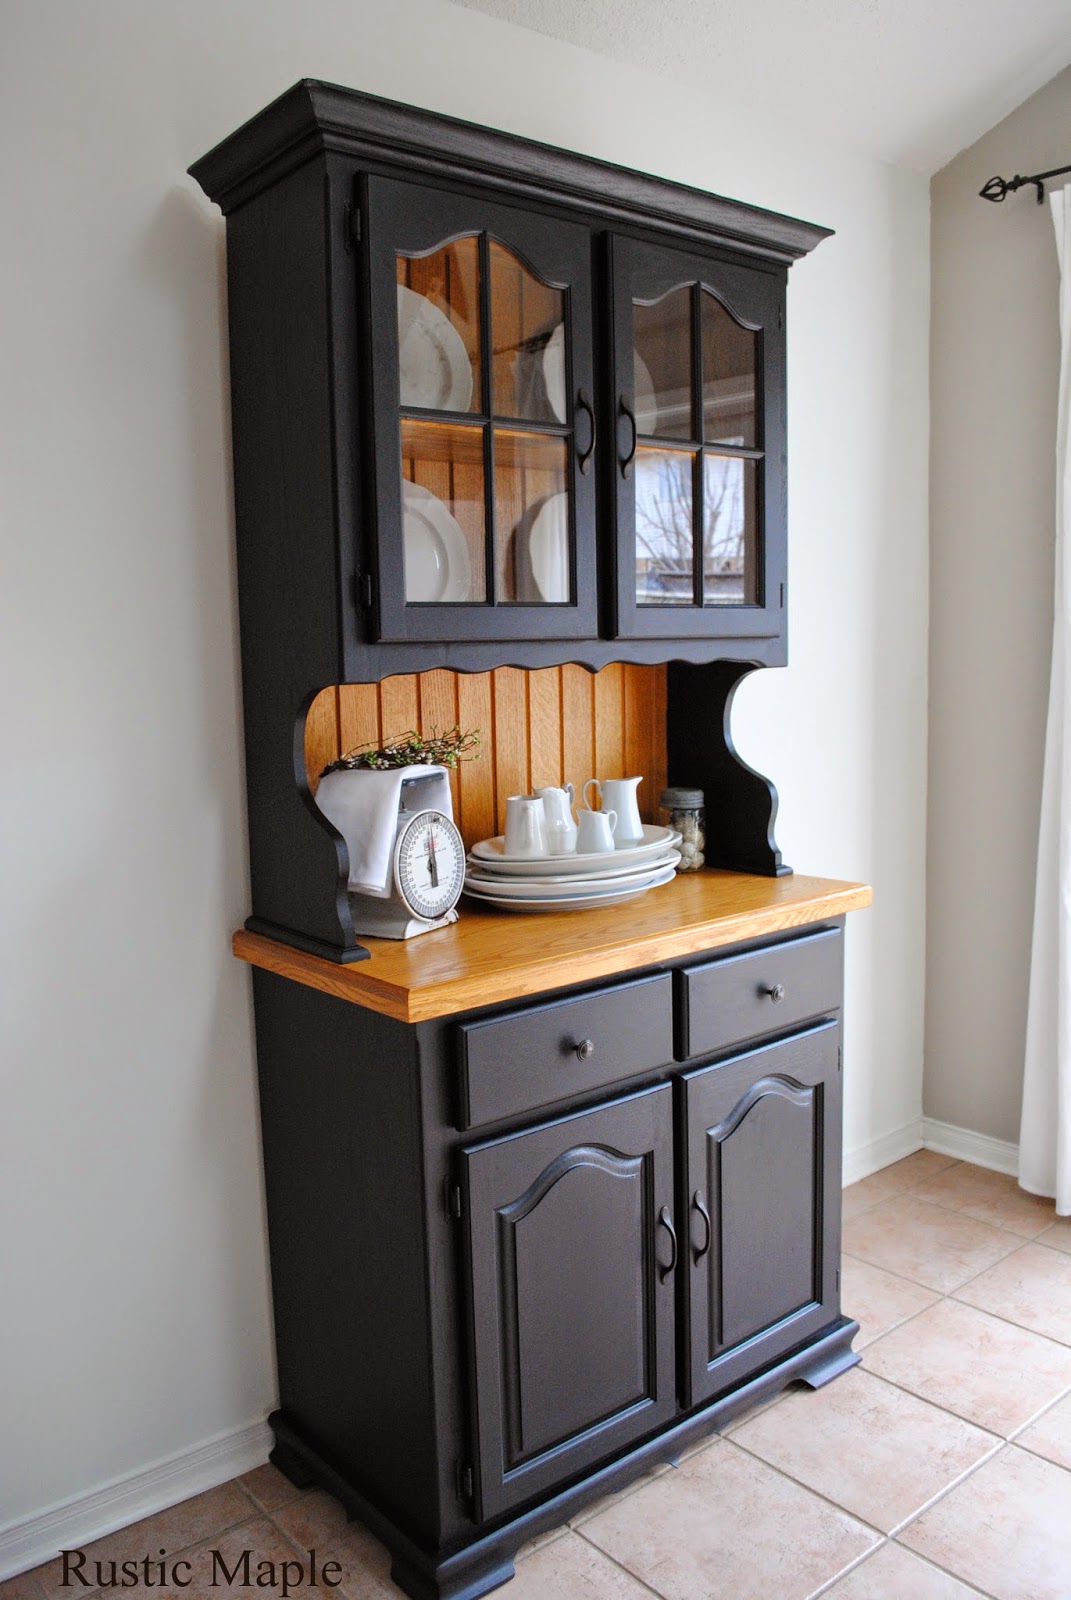
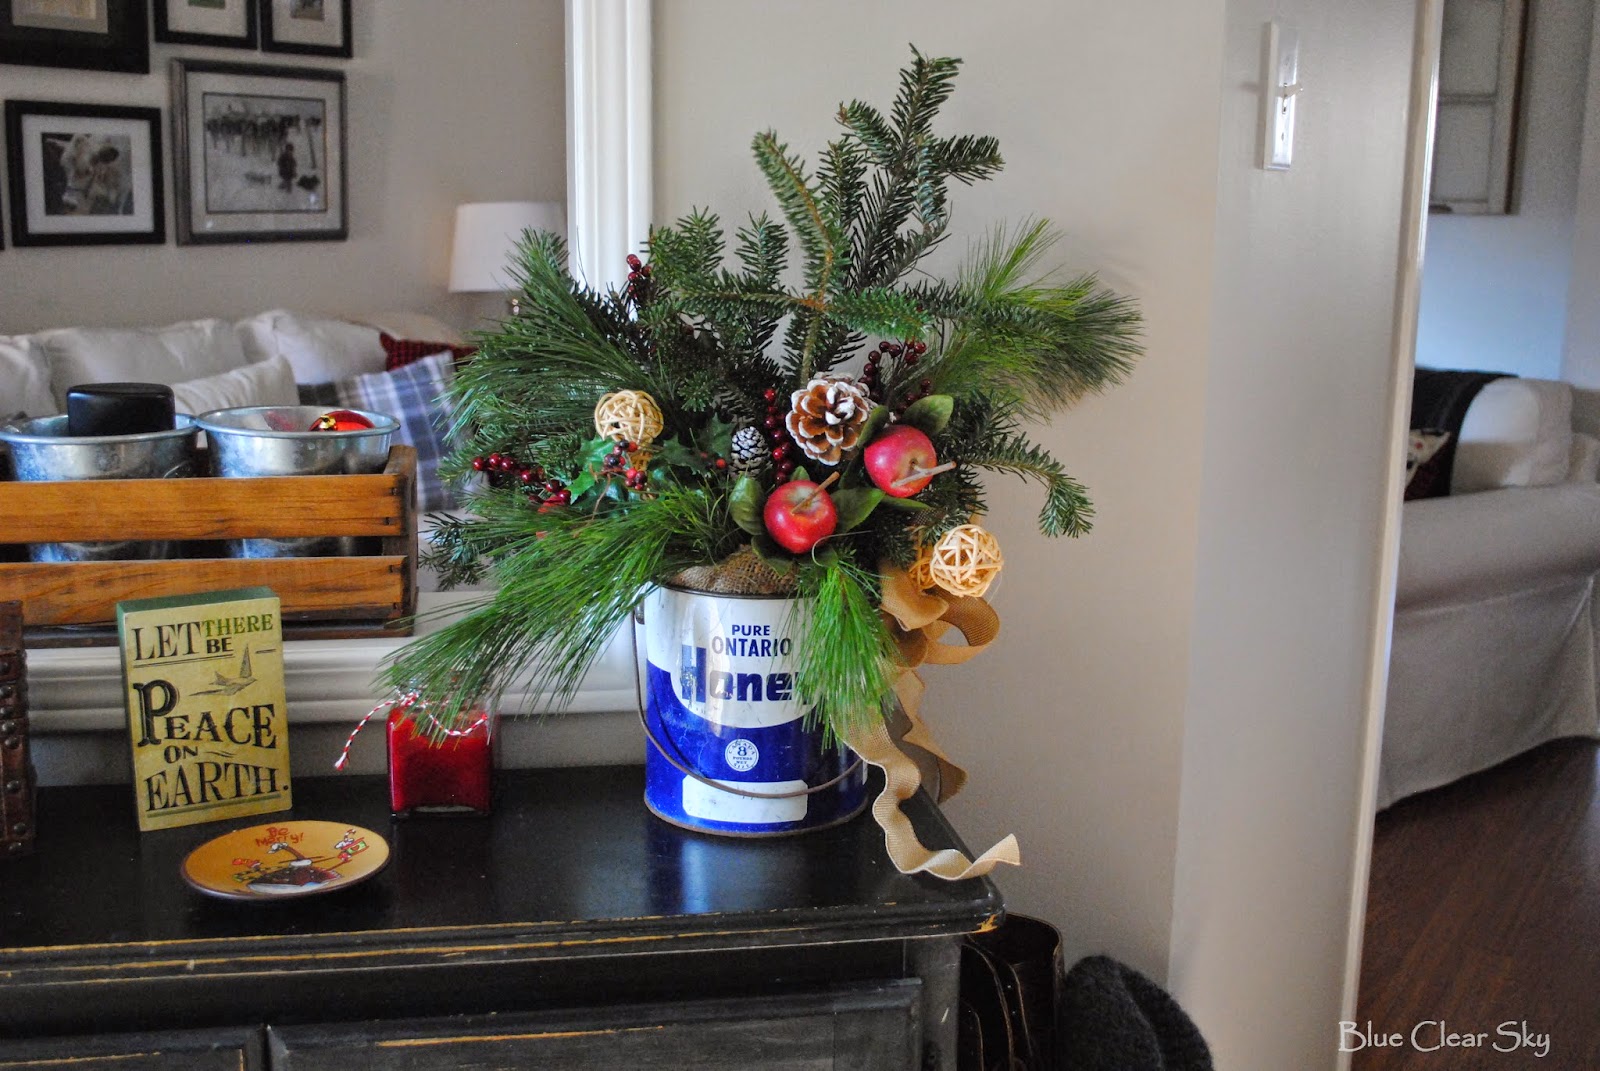
Our front entry hall is on the small side but has a coat closet, a half bath and just enough room for this black cabinet I painted. The cabinet holds baskets full of warm gloves, hats and scarves for our cold Canadian winters.


This rusty old honey pail makes a cute container for fresh greenery and fillers. I used burlap garland to fill the space between the water jar and the pail and made a bow out of burlap ribbon. Berry and apple picks, pinecones, and natural balls add some interest.


From the entry our home flows into the living room on the left, into the dining room past the stairs on the right and then back to our kitchen and family room. I love how the new lighter paint colours really help to brighten the darker rooms towards the front of our home.


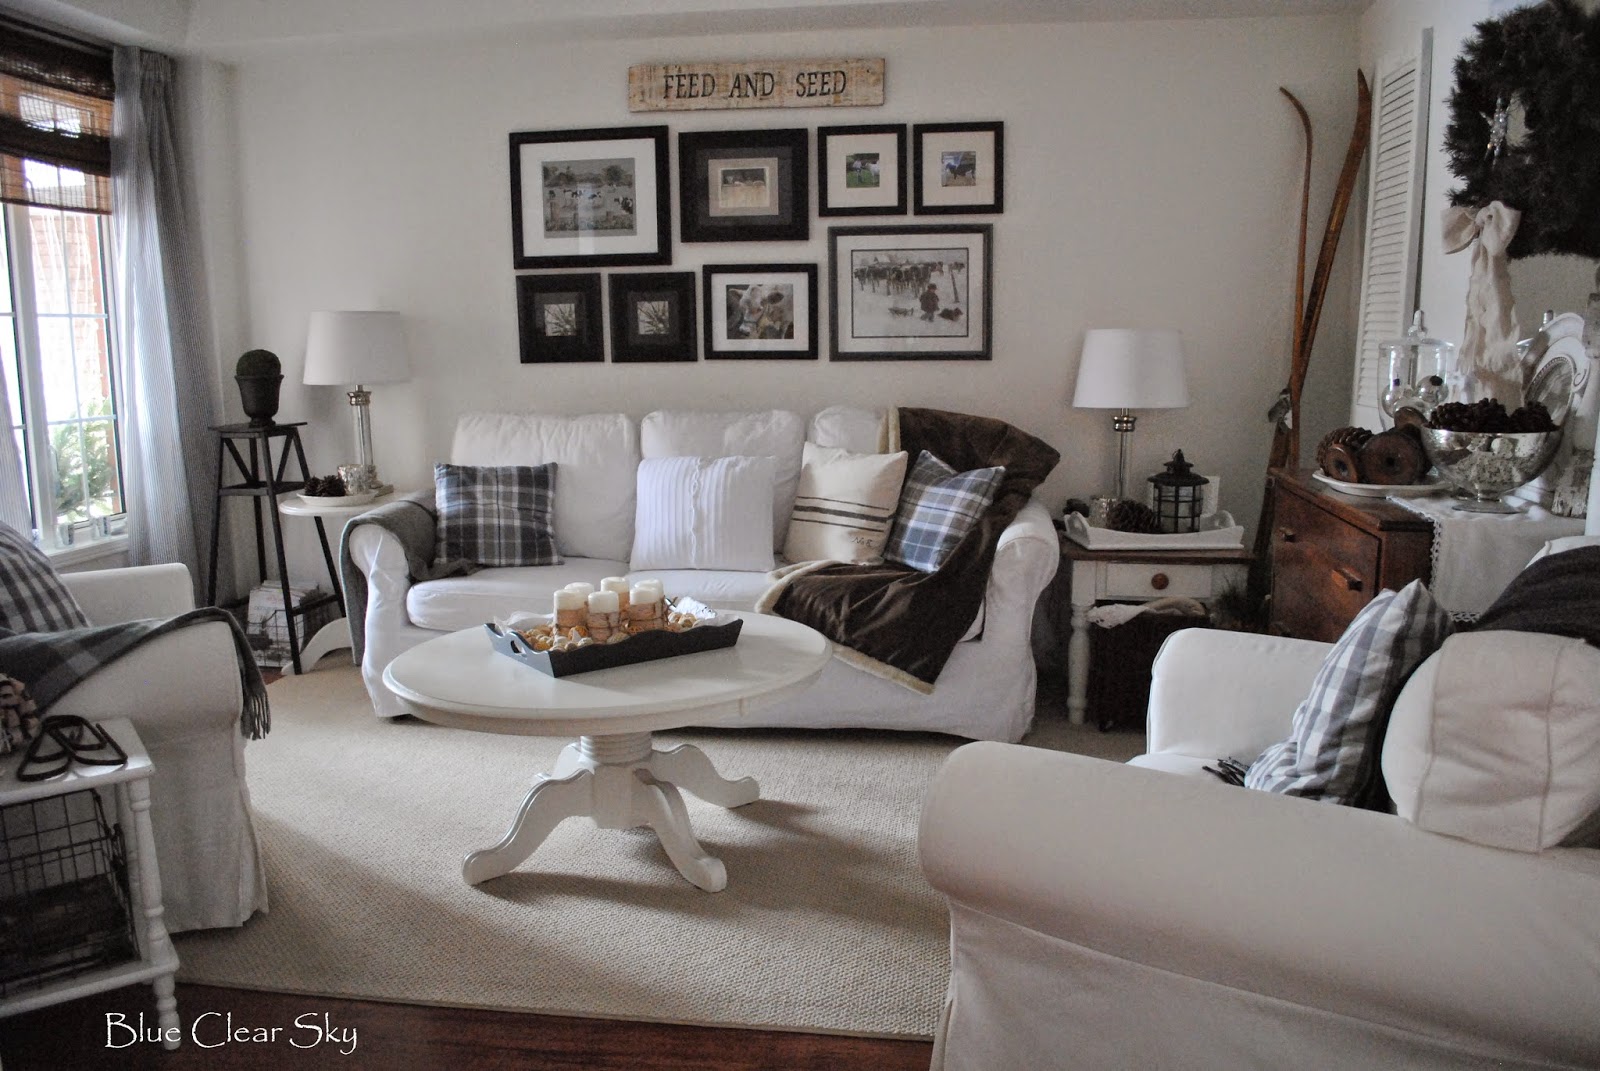
This year my vision for our Christmas decor was a cozy northern cabin with some added sparkle and I think it mixes well with our year round 'farmhouse at the lake' style. 
.

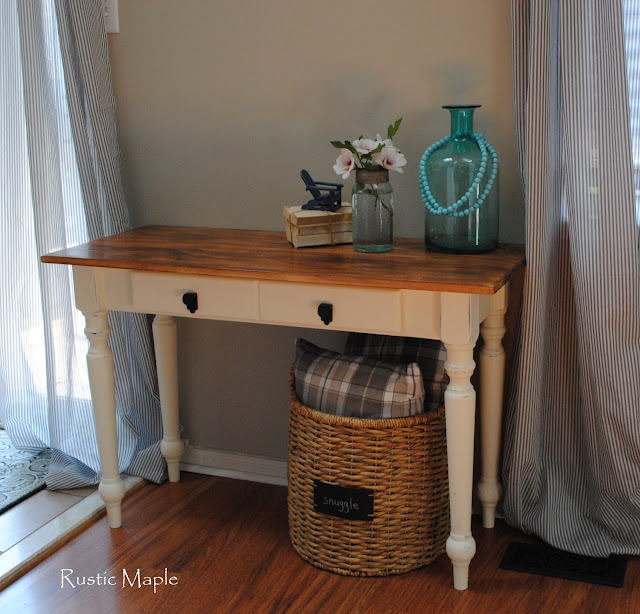
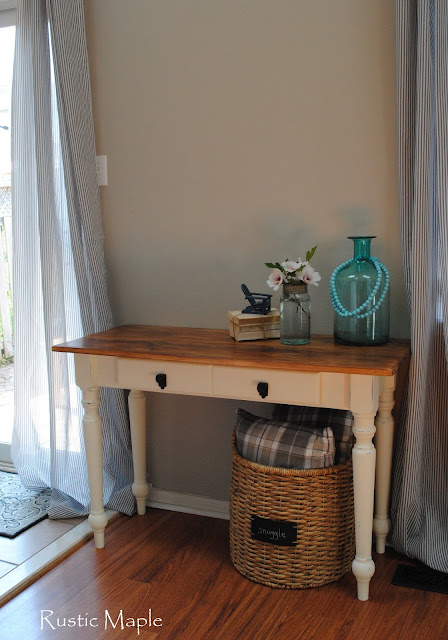
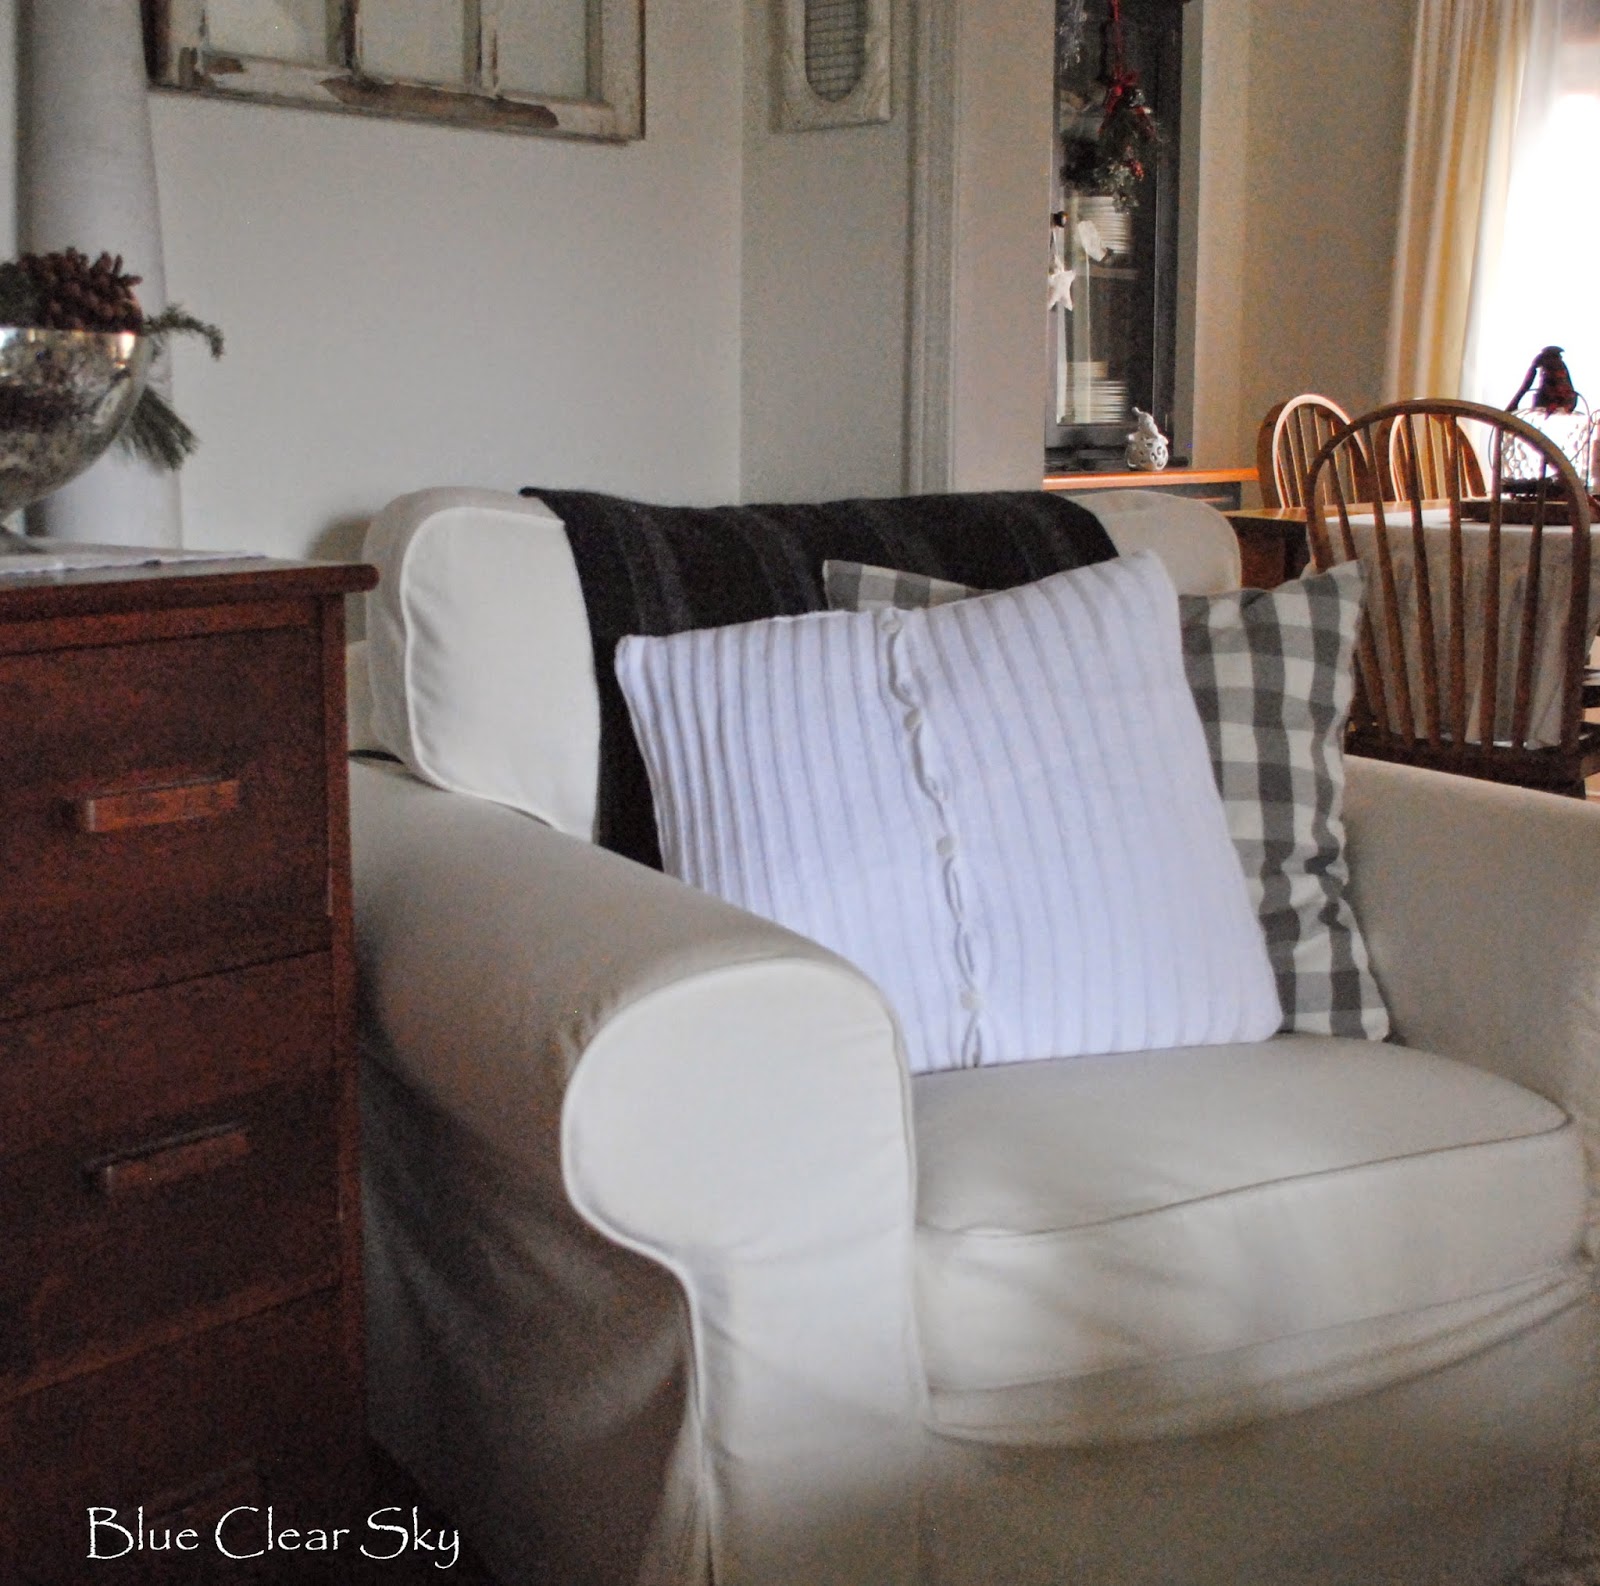
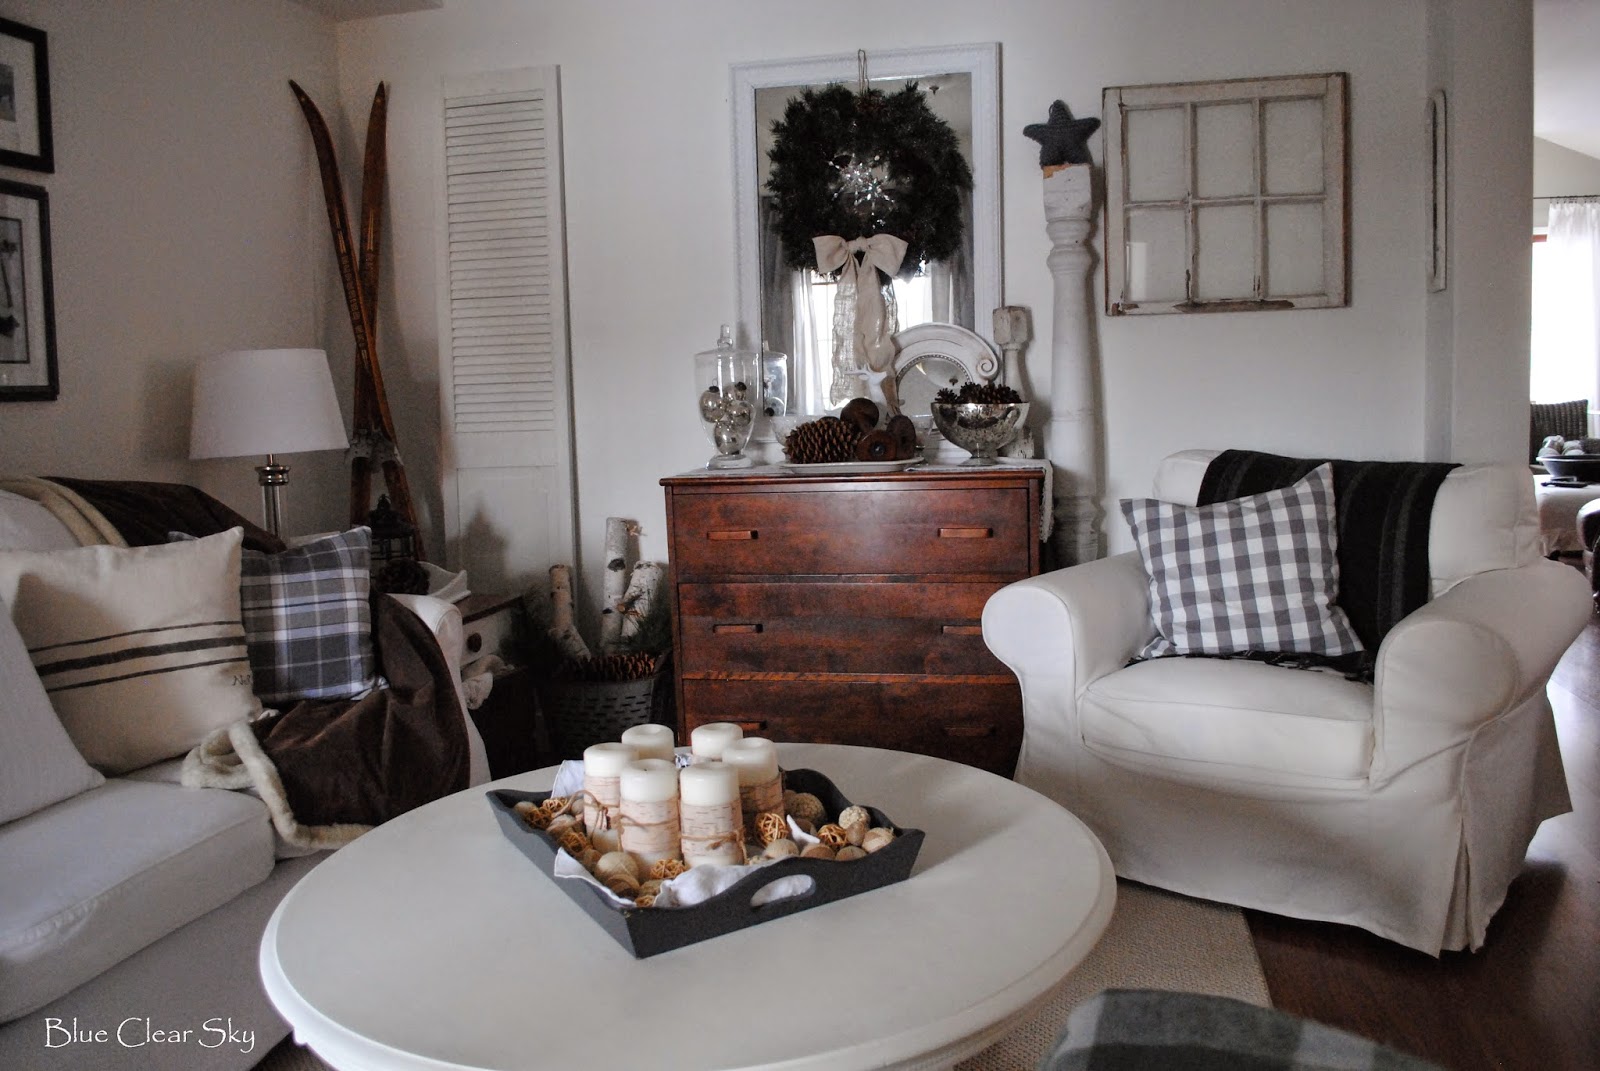
Our living room is light and bright with a neutral base of whites, grey, black and wood tones, with red and silver added for Christmas. The tables are found or garage sale pieces that I painted inexpensively to give a fresh new look.


The lanterns, vintage wooden Superior Skis and cozy throws add to the cabin feel. I love architectural salvage and it makes me think of the old farmhouse or cabin that it may have once been part of. I enjoy finding ways to display old chippy pieces. The repetition of greenery, pinecones, birch, stars, deer and moose remind me of times spent camping or at a northern cottage.  


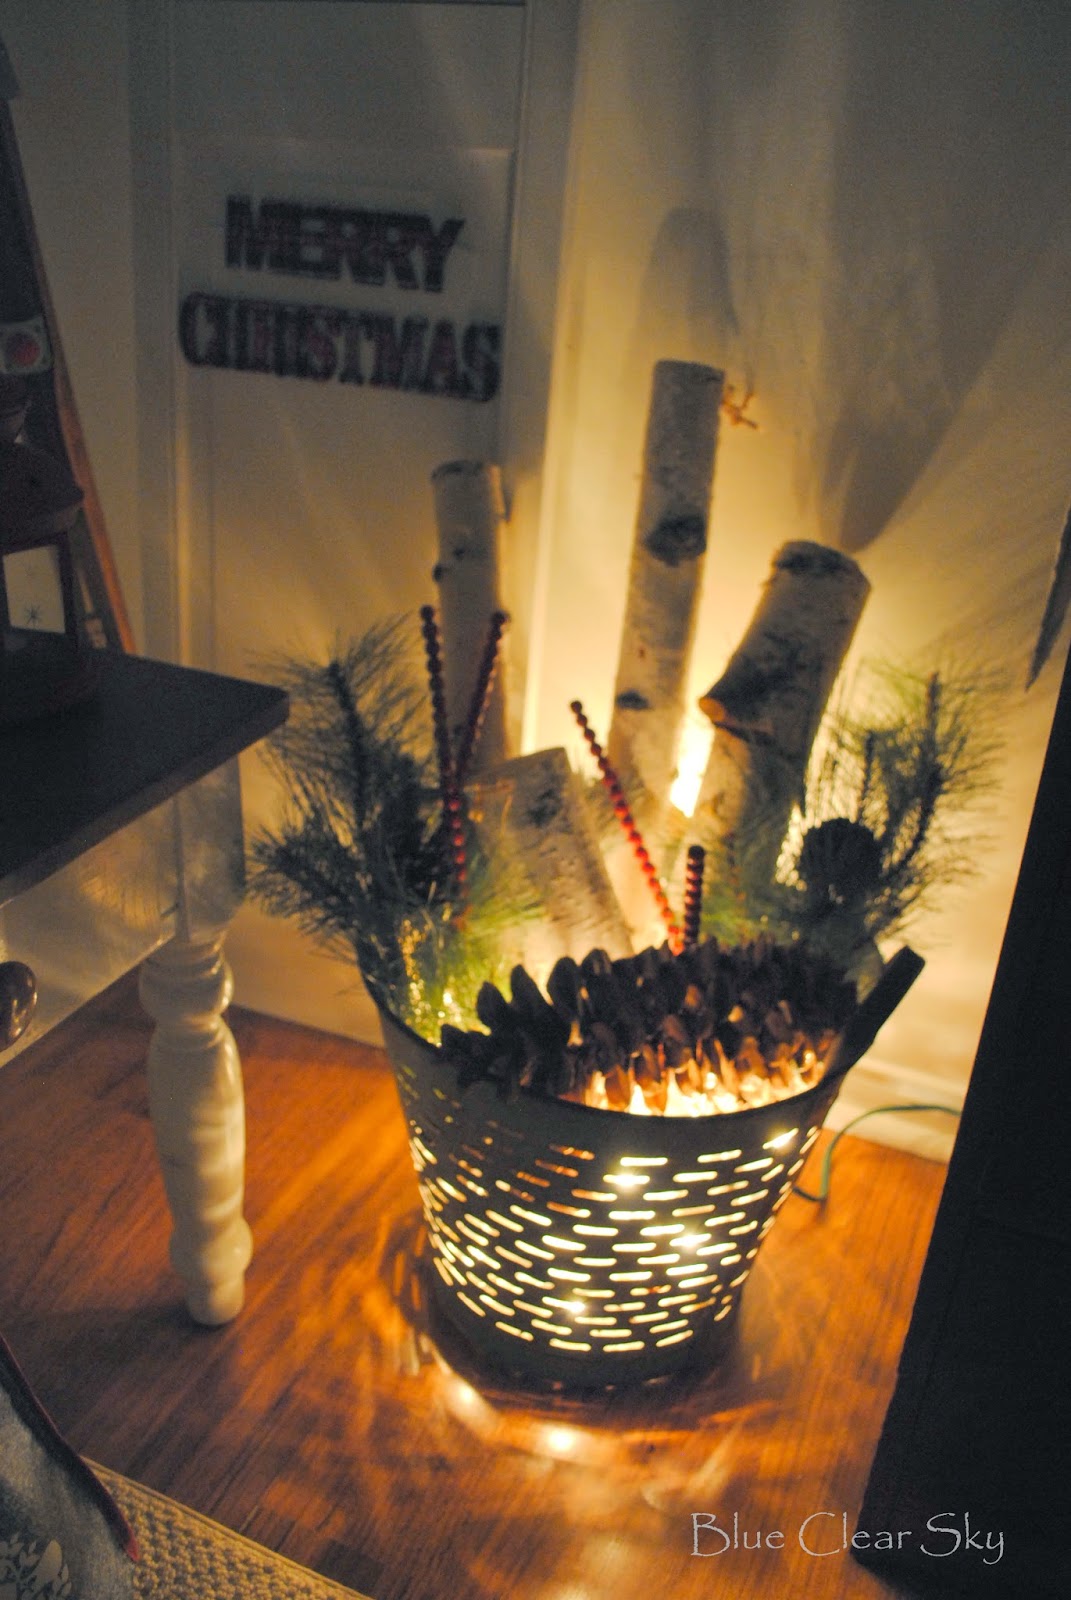
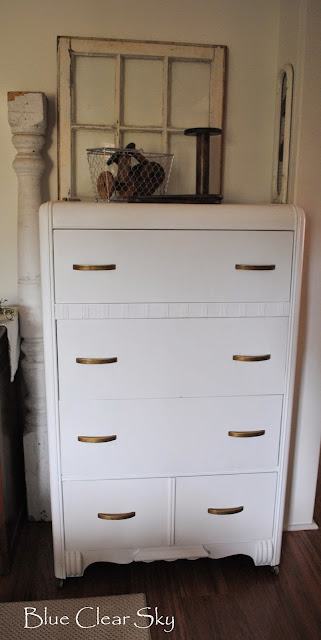
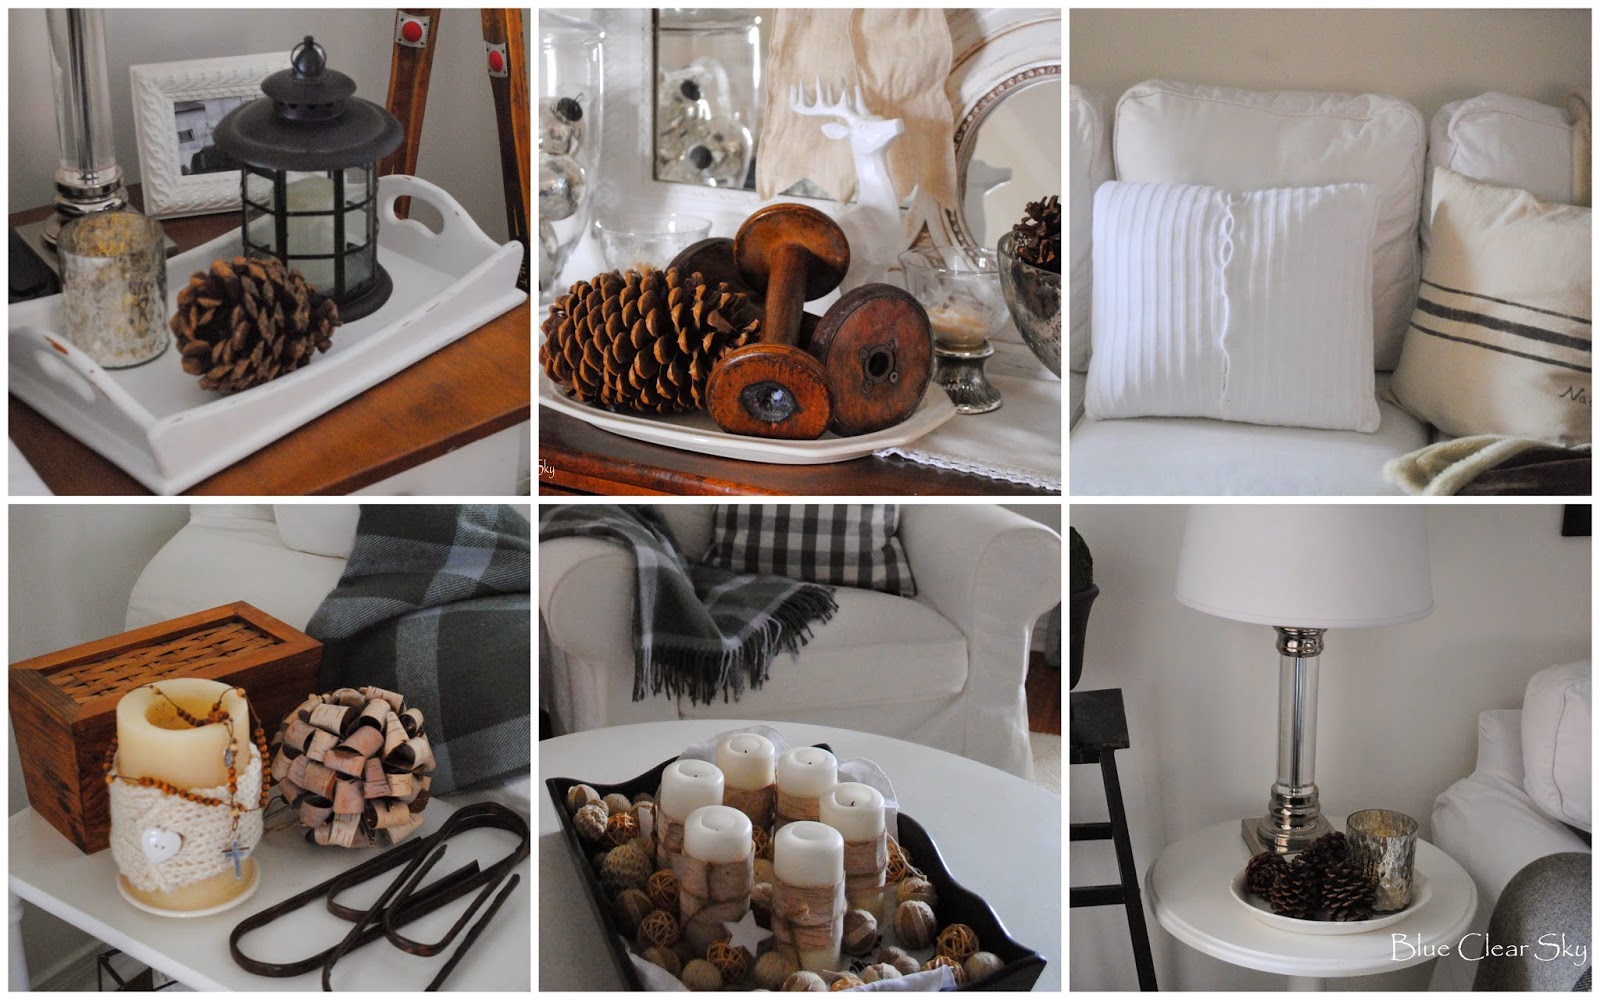
Pine cones, birch and greenery in this olive bucket add a touch of nature inexpensively. The knitting is an infinity scarf I am working on for my niece. The vintage dresser stores extra candles and keeps my knitting/crochet projects close at hand, both winter essentials for a relaxing evening at home.


More greenery and pine cones fill this footed mercury glass bowl.


Our living room tree ribbon is a red and black buffalo check. I bought tons of the red wood berry garland more than 20 years ago and it is a part of our Christmas decorating every year.


Large snowy pinecones, glittery deer and snowflakes, felt moose, silver and brown jingle bells, white, silver and clear glass balls, wood candy canes, plaid mini boxes and white sweater trees fill the tree. 


I painted the JOY and Canada flag pillows, and sewed the red and black check and moose/maple leaf pillows, last year. The coffee table tray is filled with pinecones, strings of red wood beads, large mercury glass balls and Christmas balls in various sizes. Isn't the white deer a cute piece? Hopefully he will remain safe from our chocolate lab's powerful tail lol.


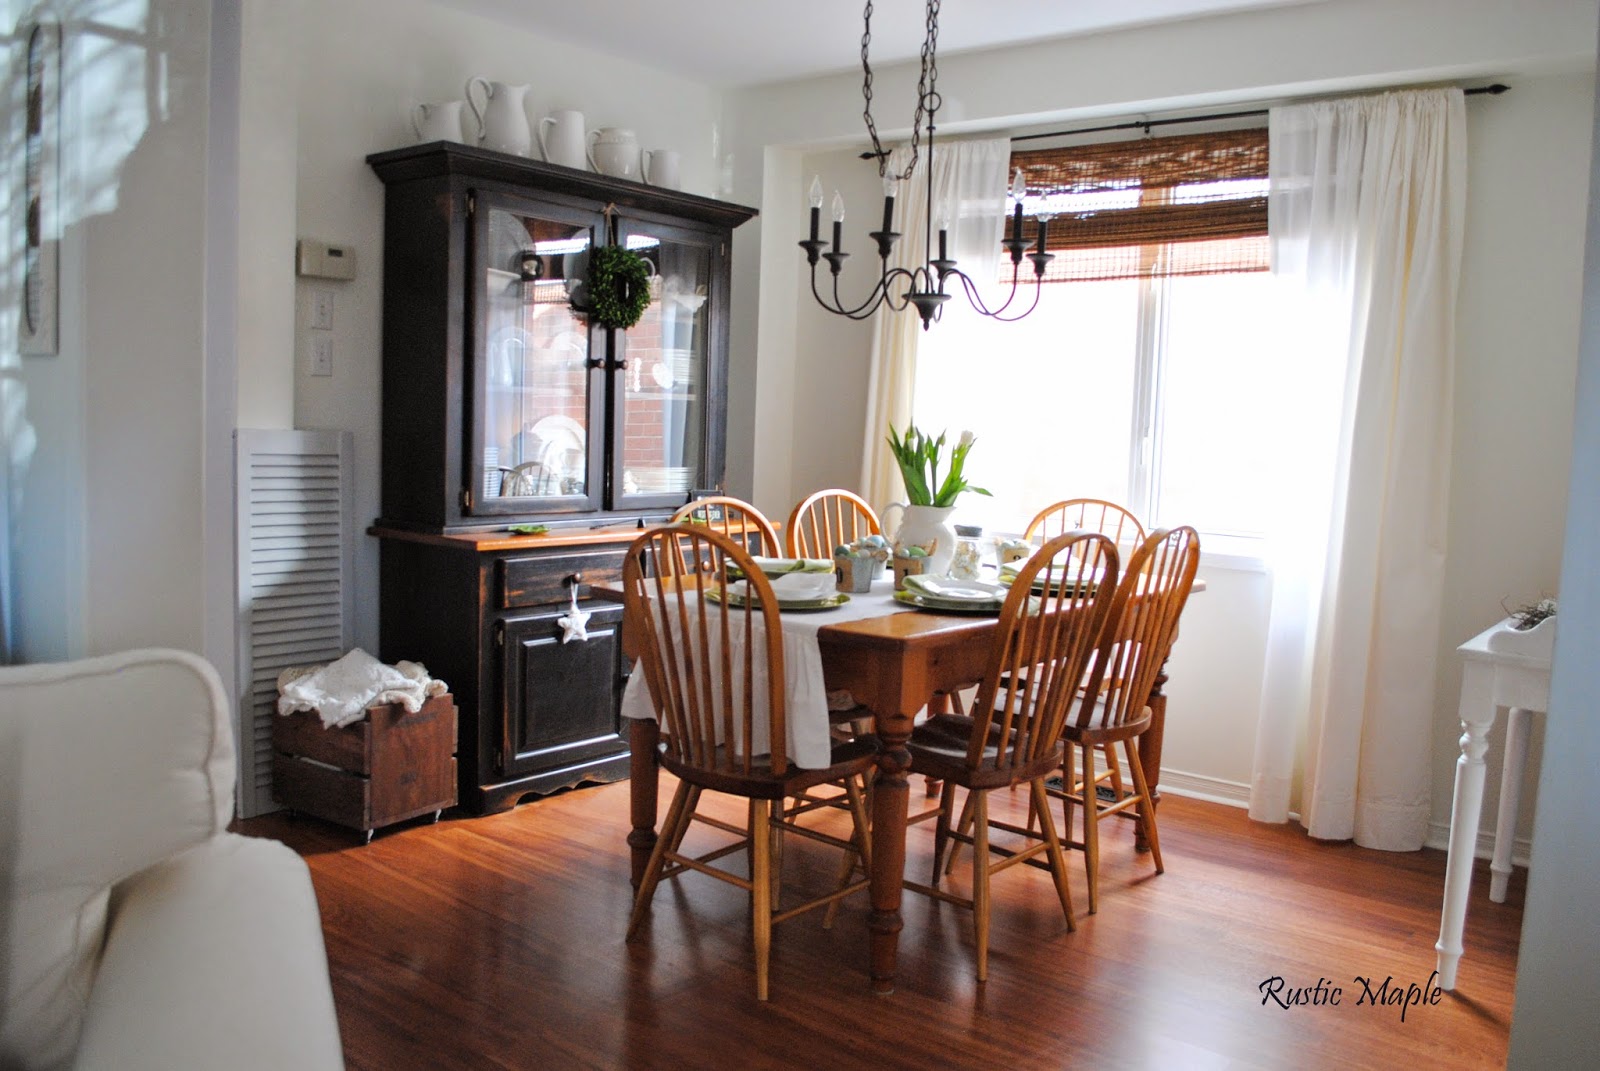
Across from our living room is our dining room. It is not a large space but I really love how bright it is with the new Simply White paint colour. 


I am searching for a low narrow buffet to paint but for now the pie safe and the bookcase, relocated to make room for the family room tree, balance out this side of the dining room. This past summer our boys stripped the popcorn ceiling from the family room, dining room and hallway and I still need to lower and center the chandy over the table.


Lately I am enjoying simple linen or natural bows on wreaths as seen here in the dining room window. The rough cut cedar plank on the dining room table is from when my father-in-law had a sawmill. On it I placed, no surprise here, more strands of red wood beads, white pillar candles wrapped in birch, white wooden stars and a pair of lanterns.


I use a mix of real and faux greenery and love to tuck fresh white pine and cedar in amongst the white dishes in the hutch. The white pitchers on the top of the hutch need to be raised higher. I have a few more of the cedar planks in the basement that will work.
 

Did I say how much I love the new paint colours? Revere Pewter and Simply White, with Snowfall White trim. Now we need to get busy in the New Year finishing the trim and mantel on the fireplace/TV wall that has been half completed for way too long. I don't have a mantel to decorate yet but in the meantime I hung our Christmas stockings from 3M Command hooks. Inspiration from Pinterest, five minutes and a chalk marker last night gave the chalkboard that I painted a new message for the season. 


The end and fireplace wall are Revere Pewter and the wall behind the leather seating is Simply White. I'm so glad we switched the leather couch with the white slipcovered sofa in the living room. This is where our family hangs out. The heritage leather holds up really well to a bunch of 15-21 year old guys.


More greenery, pinecones and birch fill this old milk pail. You will find lots of references to cows and farms in our home. My husband is from a farming family. I have always loved cows and farms. Our 17 year old son used to show dairy and beef cows, has owned goats and rabbits (which our youngest son also used to show), and currently owns and breeds Jersey cows, although not in our suburban backyard lol.


I like to include our family's interests and history in our home decor and in our Christmas decor, especially on the family tree.


Our family tree is collected and colourful but I try to pull it all together with a pretty ribbon, some homemade deer tags and repeating the red wood berry garland used in other Christmas vignettes.


This is the first year for this tree to have white lights as the guys have always requested coloured lights. They agreed to get white lights next year too.


Our soon to be sixteen year old son helped me build this crate for our family room tree. It is a simple and inexpensive touch that gave our tree an updated look this year. The crate also helps hold up a lower branch or two on our well loved 10 year old tree. I will add buckets for presents just as soon as I get my shopping started.


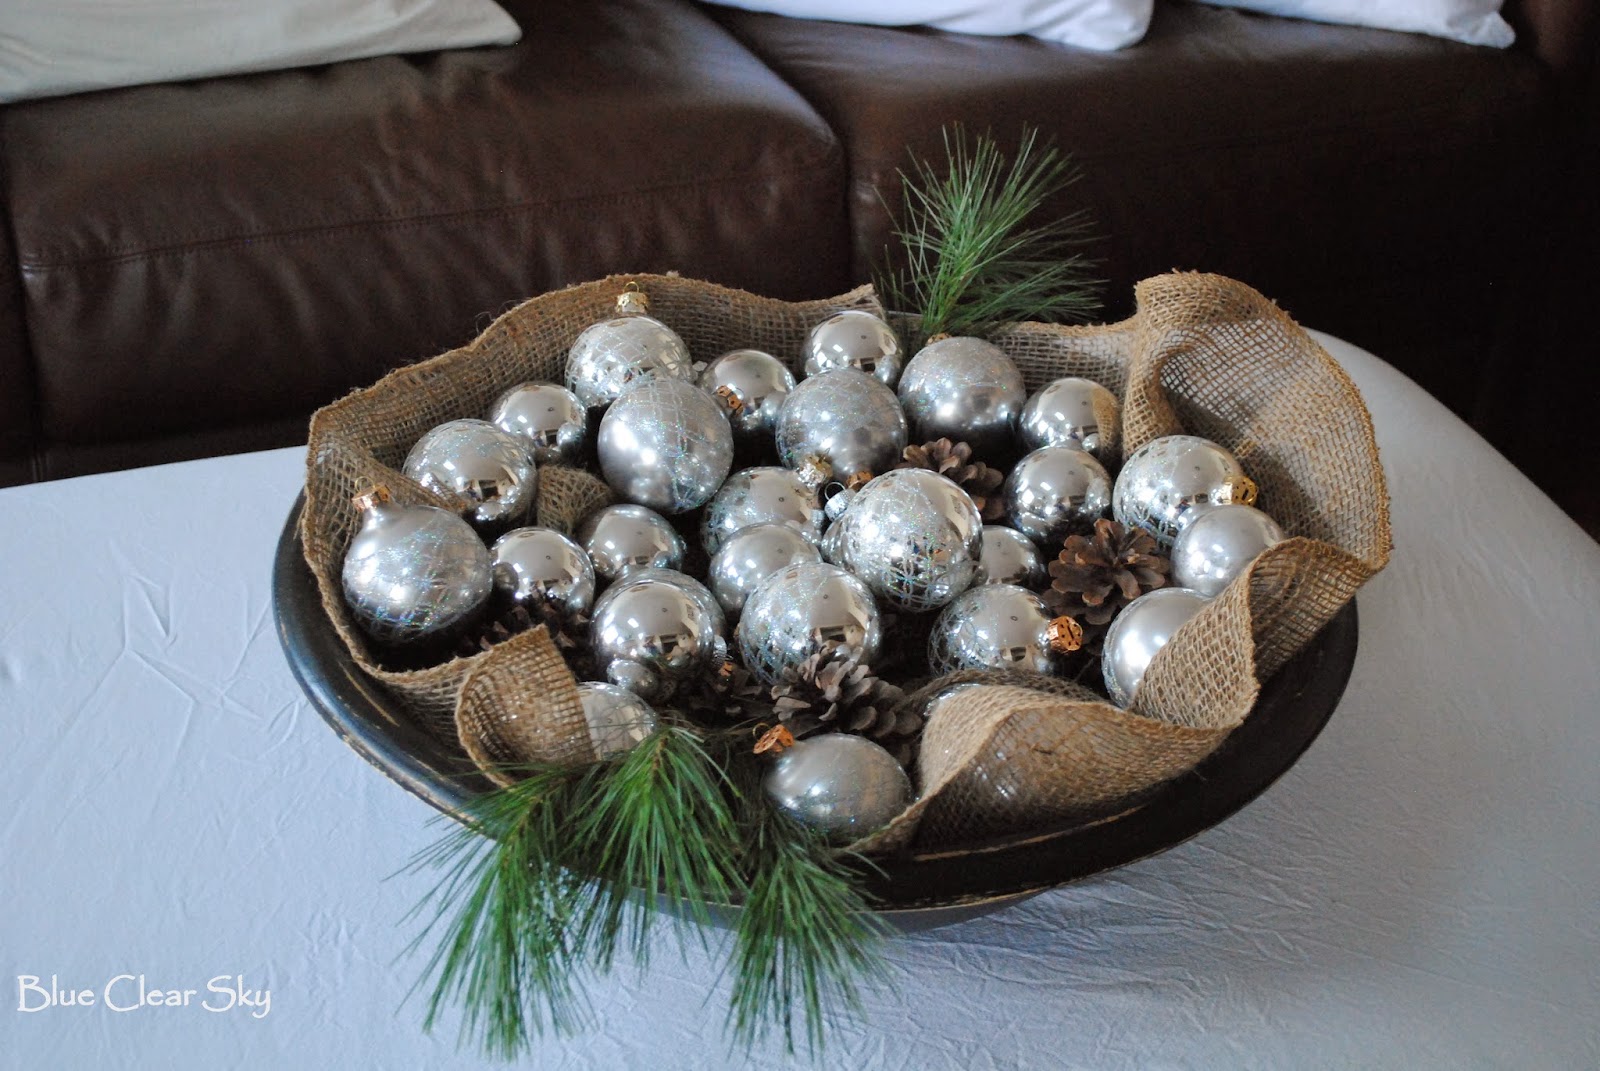
On the ottoman I filled a large black wood bowl with white pine, pinecones, burlap and vintage silver glass ornaments. The large etched and glittered glass balls were this week's thrift store score at 99 cents for 4. I was chanelling the gorgeous dough bowl full of vintage Shiny Brites image on Pinterest. My copy cat version was made with items on hand and less than $4.


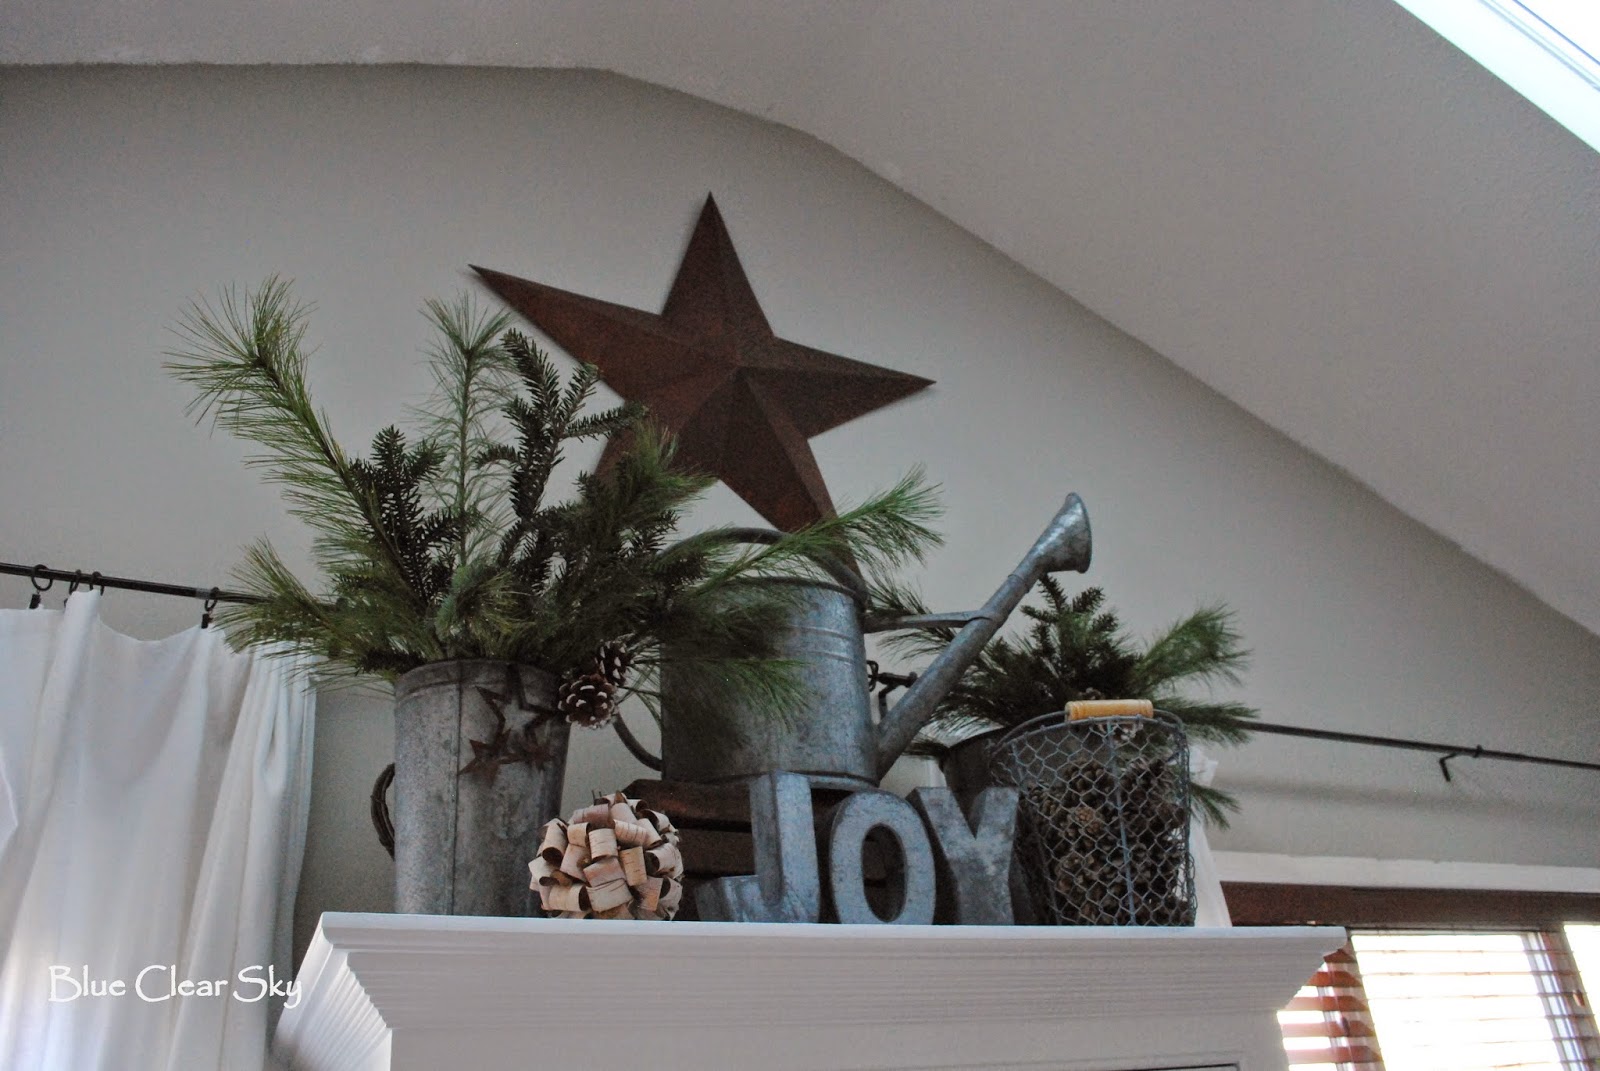
I keep my collection of galvanized containers on top of the office armoire all year. The greenery and pine cones, plus galvanized JOY letters add some Christmas cabin charm.


I love that this natural vignette can be seen from both the kitchen and family room, with a peek at it from the front entry as well.


Our family room shares the cathedral ceiling end of our home with the eat in area of our kitchen. This Fall I scored a solid oak buffet and hutch from a neighbour doing a kitchen renovation, for free! You can probably guess that it will be painted after the holidays. I love wood tones mixed with painted pieces but prefer a darker stain.


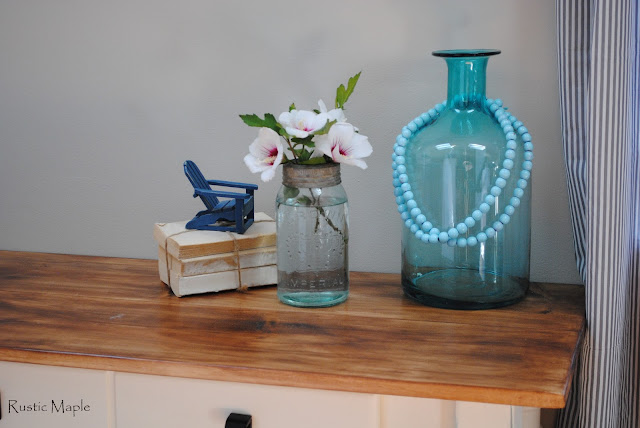
Love love the stained wood kitchen shelves that I replaced last week. My collections of aqua Crown mason jars and pudding bowls give these shelves a more simple look than previous years.


A few cuttings of fresh pine added to the ironstone pudding bowls carry the greenery around the room without being too busy.


Another bucket of greenery and birch branches with a natural ribbon on top of the fridge.


I crafted a little chalkboard cutting board for the hot beverage station in a crate on the kitchen counter. 

I still have a few more Christmas touches to add to other rooms but I am not going to stress about it and will focus on enjoying time with our family and friends.

Thank you so much for visiting. Our home is not perfect and is always a work in progress, much like ourselves, but we are very blessed to call it home. We wish you and your loved ones a very Merry Christmas! 


Favourite Vignettes From Our Christmas Home Tour and a Greenery Trick

$
0
0
I enjoy this time of year, not only because of the anticipation of Christmas, but because there are so many great holiday home tours and Christmas related posts. I love seeing different decorating styles, recipes and gift making ideas.


Today I am sharing some of my favourite little vignettes and arrangements from our Christmas home tour, seen in this post. As I putter around our home in the evening, working on last minute projects or wrapping gifts, I love seeing these little spots of Christmas cheer in our home.  Our living room dresser is one of my favourite spots, with naturals, mercury glass, chippy architectural pieces and red accents. Our full living room tour can be found here. 


At night I like to turn on the Christmas tree lights and the globe lights in this olive bucket of naturals. You can see our living room at night in this post.


This large painted wood bowl filled with pinecones, white pine, burlap and vintage silver glass ornaments is simple and really easy to pull together.


This is one of my tricks for keeping the mixed greenery from drying out and making a mess. For smaller bunches of live pine, fir or cedar, tucked here and there I use these florist water tubes. They slip easily amongst the balls or hide behind bowls on shelves. (If you don't overfill them they can lay horizontally without leaking too.)


For larger arrangements, like in the galvanized sap buckets on our office armoire in the family room, I use jars and check the water every week or so. The galvanized sap buckets and watering can get more of a winter look with the birch ball, pinecones and lots of greenery. I got the JOY galvanized letters at Michaels for 70% off. I really like how this area can be seen from both our kitchen and family room, and even a glimpse from the front entry.


This metal milk pail was a purchase, along with the olive bucket above, from Meg at Oliver and Rust's Fall Vintage Sale. I added the found birch limbs, faux greenery and a little piece of leftover ribbon from our family room tree. Again, simple and it can carry over to winter.


Our front entry is small so this vintage honey pail with greens and fillers is a pretty touch and on the cabinet, it's out of the way.


I shared the chunkier new stained kitchen shelves here and I am really enjoying the simpler decor this year.


I like keeping most of our kitchen prep space clear so I perched another galvanized bucket of simple birch and greenery up high on the fridge in the kitchen. 


We have been getting lots of use out of our hot chocolate station. The cutting board was a 50 cent garage sale find that I added a chalkboard to. Since I took the photo I have added a mason jar filled with candy canes. It is simple little touches like these that make our home feel ready for the Christmas season.

Thanks for visiting! We are spending a quiet weekend wrapping presents and having dinner with my dad and sister's family. I always decorate their live tree for them and just as we were sitting down to dinner we heard the crash of the tree falling over, shattering all their glass ornaments. Sister is not a fan of tree decorating so I can see a small tabletop tree in their future. One more week of school/work and then we get to really settle in for Christmas holidays. 

From Sweater to Pillow

$
0
0
Like many of you, I love pillows. Some I buy but most I sew myself. Sweater pillows are popular for winter decorating and I knew I wanted some. 


When I was helping my sister clean out her closet a while back I saved two snowy white sweaters she was going to donate. Last night I took a break after some last minute shopping, wrapping, and generally getting ready to host our family for Christmas. Half an hour later I had turned this cardigan into a pillow. I found it easiest to measure out my pillow size, sew the seams first, and then cut away the extra fabric. I trimmed about 1/2" from my sewing lines then used a zig zag stitch to keep the ends from fraying. Nothing fancy but it works. I kept the original button placket intact, even with the little stitch that goes between buttons and makes it pop open like that. Not the best photos on this very overcast day.


It may end up on the family room leather couch since the white is brighter than the IKEA slipcovers. One of these days, when I am looking to unwind, I will recycle the other sweater into a pillow cover. Easy and free are some of my favourite projects. 
Hoping all my friends and readers have a Merry Christmas, Happy Hannukah and a relaxing holiday. 

Merry Christmas!

$
0
0
Just finishing up some last minute dinner prep today as we are hosting Christmas dinner for lots of family on Christmas Day. Tonight we are headed to my sister's home here in our neighbourhood for a family get together. 


Wishing you all a great holiday and a very Merry Christmas! Thank you for visiting throughout the year and for your friendship.

Best Projects of 2014

$
0
0
Another year is almost over and I am making plans for what I want to complete in 2015. Looking back on my favourite completed projects from the year ending always inspires me. Today I will be sharing what I consider my best projects of 2014.


This year, more than any other, I find that I am finally narrowing in on what I want our home to look and feel like (on our tight diy budget of course.) Painting and selling some furniture has allowed me to buy a few new pieces as well. I'll keep the explanations to a minimum but you can click on any of the headings to see a related post with more details.

New stained pine shelves in kitchen

Painted vintage buffet in General Finishes Lamp Black Milk Paint

Painted Waterfall Dresser in General Finishes Snow White

Painted pedestal coffee table

Painted chairs, sidetable and chalkboard with ASCP Provence with White

Painted front door and trim, new roof, new garage door and garage man door, replacement skylights
(a post to follow when the weather is a bit nicer, that's the old roof being taken off and that photo of the snow was from last winter, we had a green Christmas this year)


Painted entry, dining room, family room and kitchen with Revere Pewter and Simply White


Popcorn ceiling texture removed in family room, dining room and entry hall
The link shows the family room, better photos of dining room and entry hall to follow

There is still so much that we want to do but we feel blessed to be able to live and spend time with our family and friends in our home. I do enjoy furniture makeovers and updates to our home as time and budget allows. Hopefully 2015 will be a year where I can continue to figure out my design style too. I look forward to seeing lots of year end posts from blogs I follow as well

Sharing at....
Wow Us Wednesday at Savvy Southern Style 

Our Winter Living Room

$
0
0
 Our winter living room feels so fresh and cozy now that the holiday decor has been packed away.


White and wood is the foundation of my lakehouse/farmhouse decorating style. I am learning that I am happiest with a room when I start with white and wood and then I can add in other colours and textures. I love the fresh white of our living room walls (that really help with overcast days and early darkness), slipcovers, and white painted tables mixed with the wood tones in the flooring, dresser and vintage skis. I use black, grey, brown and off white in accessories and natural elements. Mercury glass adds a touch of sparkle.


I kept the simple wreath with a glittery beaded snowflake and linen bow hanging on the mirror above the dresser. My favourite spot to sit is the end of the sofa with the thick suede and sherpa throw.


Our living room walls are Benjamin Moore Cotton Balls and the new colour peeking in from the front entry is BM Revere Pewter (love it!). On the pedestal coffee table that I painted white, I added lots of natural wicker, burlap and string wrapped filler balls to a tray filled with pillar candles wrapped in birch.


I have been working on the stairs to the basement, tearing up carpeting and patching walls. There is still lots to do. We ordered black iron lever type door handles and hinges for the front hall bathroom and closet doors, and the basement landing door. Now I just need to install them. 


Our winter living room seems 'quieter' with the Christmas decor stored, but there is still lots going on in different vignettes. I don't do minimal well lol.  I added texture with the white sweater pillow (still need to finish one) and the candle cozy I knit. I like using trays and ironstone platters to corral decor items and it makes it easy to move a display too.


Besides the wreath, I kept out mercury glass in tealight holders, oval balls in the apothecary jar, and the footed bowl, plus pinecones and the white deer.


I would love to find a pair of snowshoes to go with the vintage wooden skis.


More texture in the chippy old window frame, porch post and the little grey knit star.


Stacks of decorating magazines and Restoration Hardware catalogs are close at hand in wire baskets. The distressed black plant stand was a $2 garage sale purchase. The grey and white striped curtains from IKEA still need to be hemmed.


I added some extra throws to the wooden crate under the end table.


The olive bucket still holds greenery, birch logs and large cones and in the evening I turn on the strand of globe lights that are tucked inside.


The footed mercury glass bowl has snowflakes etched on the sides that echoes the beaded mirrored snowflake on the wreath above.
  

Despite being an overcast day, the light really reflects off our snow.


With the cold January weather and snow we have been getting, coupled with some long drawn out cold viruses, we are enjoying snuggling into our warm home after a day at school and work. Our cosy living room is my favourite place to relax with family, read or do some needlework. The aquas and turquoise may reappear in Spring or summer, but for now I am enjoying this room decorated for winter. 

Sharing our winter living room at the following link parties...

Lamp Black Dresser For Our Master Bedroom

$
0
0
I have been working on defining my design style and, keeping our tight budget in mind, I am slowly updating things to better reflect that style. Black painted rustic furniture has always appealed to me and is exactly the look I wanted for our bedroom dresser.


I used General Finishes Milk Paint in Lamp Black. I plan to paint the walls white and eventually we will replace the worn carpeting.


The before photo shows this well used 1990's dresser with all its dings. I like this style and it is super solid with thick dovetailed drawers and dust liners. This dresser is on the wall opposite the foot of our bed and we put the flat screen TV on it temporarily. Yes, that is a large TV and we do have others in our home, but it is the perfect size for this glasses wearing girl and the family to pile on the bed and watch something. We will be moving the TV back into the nook to the left of this dresser now that the roof has been replaced and the leak fixed.

The previous hardware was antique brass, and while not a bad style (especially after I removed the plates from behind the knobs) I felt the dresser would benefit from some updated hardware. And paint. More than a few games of hockey with mini sticks has spilled over into our bedroom with our boys and their cousins.


I was going to go with black hardware but ended up falling for these knobs and cup pulls from Home Depot. The are Rochdale by Amerock in Satin Nickel.


The have an industrial look with the rivets and more utilitarian design. I really like how the satin nickel adds a bit of contrast. 


After a failed attempt (and a two hour drive) to pick up the co-ordinating General Finishes top coat I ended up using Varathane Diamond Wood Finish (water based) in Satin.


I will take a closer look at those rough spots on the top, it might need a light sand and third coat of finish. The door in this photo leads to our ensuite bath. The door handles will be changing to black levers like the ones I just replaced on our main floor.


There will be lots of white and neutrals in our master bedroom so it won't be too dark with the black dressers, I lightly distressed the edges in a few places.


I am thrilled with how this dresser turned out. The GF Milk Paint and Varathane were left over from other projects, so the cost of this update was $70 (Canadian) for the hardware. Now I need to decide what to put on the wall above the dresser. Right after I paint the whole room {sigh.}

It has been a very cold and snowy February here in southern Ontario and we have been working on lots of little projects in our free time. I made the decision to change my blog name after 5 years (more on that later), and buy rusticmaple.com. I still have lots to work on but if you see me around your comments, Pinterest or fb as Rustic Maple it's still me!

Sharing this at....
Show and Share at Coastal Charm
Inspire Me Monday at Sand and Sisal, My Uncommon Slice of Suburbia, Domestically Speaking, and Sweet C's Designs
Share Your Style Link Party at The Essence of Home, Common Ground, Northern Nesting, Uptown Acorn, No Minimalist Here, The Vintage Nest, Dixie Delights, 21 Rosemary Lane

New Lamps for Our Master Bedroom

$
0
0
I am beginning some updates to our master bedroom and recently picked up new lamps for either side of our bed.


Glass lamps have been on my list and I found a pair recently in Target (all Targets are closing down in Canada.) These are fillable but I may just leave them as they are. The wall behind the bed will soon be Revere Pewter and the leather headboard will be getting a slipcover.


Above are the previous lamps. They are wrought iron and if I give them new shades they may make an appearance in a guest room. Time will tell.

I have been working on making changes to the blog and at the same time working on a million and one projects around our home. Call me scattered. I blame it on my creative side that has so many projects swirling around in my head and not enough time or money to get it all done. We are starting to see some progress though.

In continuing to narrow down my design style, I have sold some furniture and accessories. They were okay pieces but not what I want long term. Selling the pieces is giving our rooms a bit of breathing space and as a bonus a bit of money that I can use for other projects.

After finishing the Lamp Black Industrial/Rustic dresser (and loving it!) I moved on to paint some smaller dressers that we will use for night tables until I find a pair equal in size. I will share them tomorrow. The previous night tables were too short for the height of our bed.

If you have my blog in your blog roll (thank you!) could I ask you to consider changing the name or re-following to update to Rustic Maple? Subscribing is another option. My google+ (which I never fully utilized) was lost in the transition. Thanks for considering this and I hope your week is going well. See you tomorrow with the side dresser makeovers.


Three Drawer Dresser Painted General Finishes Lamp Black

$
0
0
Today I am sharing the second dresser that I painted with General Finishes Lamp Black Milk Paint.


GF Lamp Black is such a pretty black and a really easy product to use. It only took two coats for complete coverage and the paint goes on smooth and levels really well. Later I will share the three large pieces that I painted with one can. I tried to get the GF Top Coat but after a 45 minute drive each way, the supplier I normally buy from was out of Top Coat and Lamp Black. Lesson to self: call ahead! I was disappointed but ended up using Varathane poly in satin.


This three drawer pine dresser was part of my original bedroom set that I bought when I was 19. It is a well built solid wood piece with dovetail drawers. 


Eventually the dresser ended up in our oldest son's room (keeping it real with the cattle brochures and junk on top before he changed bedrooms.) The finish was well worn with lots of knicks and scratches so I didn't feel bad painting the wood finish.


Our previous night stands in our bedroom were too short for our high bed so I am using this small dresser as a night table. I am really enjoying it's new look and all the extra storage space. I chose not to distress it at this time but I will probably change out the porcelain knobs.

I still have the double cannonball bed and a night table that are part of this set and they will be going in our guest room after I paint. If I end up finding a matched set with the right dimensions, this dresser will return to the guest room. We had a 3 way room switch recently (oldest son to basement bedroom, youngest son to oldest son's room, and guest bedroom from basement to youngest son's room. Confused lol?) 


I shared the other dresser I painted GF Lamp Black for our room. Yesterday I patched the walls and I will be painting soon. I was going to make a white denim slipcover for the headboard but now I am considering making a wood headboard. Baby steps, and we really need new flooring, but it is coming along.

Linking up to the following parties...

Boxwood Wreath

$
0
0
I love the pop of green that boxwood adds to both an interior space and a porch or garden.


Target stores are closing here in Canada after only two years. The prices are quite a bit higher than US stores but with 40% off all remaining merchandise I was able to get this small Smith and Hawken preserved boxwood wreath that I had been admiring. Regular price was $29.99 (they were sold out of the $49.99 larger ones.)


I am enjoying it in on the black hutch in our dining room right now. 


The pop of green inspired me to find things we already own to create a simple Spring tablescape that I will share next week. This is my first post using the Blogger app and cell phone photos.

Hoping you are enjoying this last weekend of March. Our oldest son celebrates his 18th birthday today. Where does the time go!?

Spring Dining Room

$
0
0
The snow is still melting and it is cold here but some sunny days have inspired me to lighten our home for Spring. Today I am sharing our dining room and an Easter tablescape.


Our dining room is simple and is starting to reflect the rustic farmhouse/lakeside feel that I am working towards. Our dining room table and chairs are not as orange as they appear in this light. One day I would love to add some white slipcovered chairs and a rug. We recently centered the light over the table and that makes it look much better but we still need to shorten the chain.


Our cabinet is filled with white dishes, some mercury glass and few favourite pieces. I plan to paint my black buffet and hutch for a less distressed look and to cover the more orange tone of the stain. It will be a more solid black. The little boxwood wreathadds a pop of green and inspired the Spring tablescape.


The dining room walls are painted Benjamin Moore Simply White and the far wall that acts as the hall to other rooms is BM Revere Pewter. I like white and grey as backdrops to all the white, wood and black that I use.


I love that the ceilings are smooth since our oldest son stripped the popcorn texture. Blue and turquoise are my normal accent colours but I like the fresh green that I added using items we already own. The only newly purchased items in this room are the boxwood wreath and a bunch of white tulips from the grocery store for $5.99.


The green chargers were on clearance at Michaels for 75 cents each. The simple white plates are caterer's plates that I use for buffets, parties and bbq's. They were very inexpensive, are sturdier than paper or foam and we can put them in the dishwasher after a big crowd, 


I only had four green napkins so I used two white ones on the end settings. The curtains are several years old and I sewed them from simple tone on tone striped cotton. I also sewed the table runner using moire cotton left over from the wedding dress my sister sewed for me.


I bought the tulips yesterday and they are just starting to open. Maybe it's because I was an April baby, but I do love Spring and tulips.


The crown mason jar filled with speckled eggs inspired me to fill some little numbered galvanized pots with faux coloured Easter eggs. I didn't want to go to the store to buy basket filler so I made some from cardstock and burlap.


I sold the white and turquoise jelly cupboard that was in this corner. We would like to make a long buffet-like table for the wall opposite the china cabinet. For now I am using a little pine table that I recently painted.


I still need to add some art or decor to the walls but I haven't figured out what.


The opening in the wall adds light to the basement stairs but the partly open concept with limited wall space in this room makes it a challenge to arrange things on the walls.


Pussy willows, bunnies and a nest add some Spring and Easter touches to the little table.


White tulips are my favourite. In fact white flowers in general are my favourites. Does that make me boring lol ?


Thanks for stopping by! I will be sharing some basement stair way progress and a before and after on the little pine table later in the week. 

Linking up to the following parties...
Show and Share at Coastal Charm
Wow Us Wednesday at Savvy Southern Style

MMSMP Ironstone Table A Year in The Making

$
0
0
Have you ever had one of those projects that you gave up on because it just wasn't working out? I gave up on this little table for a year before taking it back out and trying one last time to finish it. 


I have painted a variety of furniture pieces using many different paint brands and even homemade chalky like paints using latex and plaster of paris. This was my first time using Miss Mustard Seed Milk Paint. I bought a package of Ironstone powder, MMS bonding agent, and a little battery operated mixer. 


I started by cleaning and lightly sanding this little pine table. It was a kijiji find with dated stenciling and a worn finish.


After watching several videos and reading up on the do's and don'ts I mixed up my first small batch. I tried it on a small area but I made it too watery and lumpy so I ended up dumping it out and starting again. For the next batch I used the little electric whisk. Too bubbly and watery. In my frustration I ended up breaking the safety lid off the bonding agent container. My third attempt was better and I painted two coats on the table. I had to work out some small lumps but at least I didn't make it too watery this time. It clearly needed more layers of paint but at this point, and probably due to my inexperience with the product, I put the table away for awhile. Okay, just over a year. 


We have been organizing and selling/purging items in our home recently and I decided to give this little table one last chance. There was only a bit of the Ironstone MMSMP left in the package but it mixed up nicely this time and there was just enough to add the last two coats. I skipped the bonding agent this time (remember I had broken the safety lid off and couldn't open it.)  There were only a few tiny spots of chipping and cracked paint so I helped with some distressing. I also very lightly sanded any small bumps. Finally I waxed it.
 

The waxing gave it a nice feel and finish. I plan to buy a glass knob on my next visit to the hardware store.


For my Spring Dining Room tour I added a black knob from my stash. I may end up selling this piece but for now it displays a simple Easter vignette.


My intent in sharing my mishaps with the product is not to complain, but to explain that a bit of practice and patience certainly helps. I wish I had not gotten frustrated because I could easily have finished this little table a year ago. I could probably have painted more than one piece with a whole package too. Ironstone truly is a lovely colour. 

Happy April friends! Thanks so much for taking the time to visit. Have you ever had a furniture painting project not work out? Were you able to rescue it?

Happy Easter and Happy Passover

$
0
0
Wishing you and your loved ones, wherever you may be, a Happy Easter and a Happy Passover.


"The risen Christ is celebrated in every opened flower, in every beam of nourishing sunlight,
in every humble patch of green beneath our feet. Easter blessings."


"May you be blessed with happiness, prosperity, peace and good health on Pesach and always! 
Happy Passover."

Ten Minutes, Spray Paint and a Barn Star For Our Half Bath

$
0
0
We enjoyed a beautiful Easter weekend with family. We are so close to seeing signs of spring but Saturday night brought a fresh 8 cm of snow. Thankfully it has melted again. 

We won't be able to start any outdoor sprucing for another month but we have been organizing indoors, purging and selling home decor pieces. After doing a three way switch on our guest bedroom and both our boys' bedroom I have rooms to paint and lots to organize! 


Our main floor half bath is close to being finished. I decided I could re-use a metal barn star for wall decor by giving it a new colour. Ten minutes, black spray paint and it looks like new! 


I use quite a few barn stars in our decor and I especially like the raised pattern on this one. The solid black makes the raised scroll a bit more subtle. I hung it on the wall opposite the door and it can be seen from the front hall entry.


This was the star in a mantel shelf vignette from 2009. 


Our half bath is coming along nicely. When I painted this bathroom last year (Benjamin Moore Grey Owl) I also painted the ceiling, door and trim. Last month I switched out the circa 1998 shiny brass door knob (and hinges painted over by the builder) for this black Schlage door lever and hinges. 


At $38 (Cdn$) for each door lever and $5 for hinges it wasn't inexpensive but I think it really adds to the style of our home. So far we have the main floor doors completed. We also switched out the door stop to black and re-hung the black iron towel holder and paper holder. We bought a new faucet that needs installed and then we just need to frame the mirror. I will share a final look when the last few items are completed.

I hope you had a pleasant Easter. Is your area enjoying Spring weather or beginning to show signs of Spring?

Basement Stairway Progress

$
0
0
Our stairway to the basement has seen some progress recently. We painted, added new door hardware, stained the railing and added hooks for coats.


For the coat hooks I used a leftover piece of oak, stained it Early American and added black iron hooks that we already had. I should have picked pine because the small black screws that came with the iron coat hooks kept snapping off in the hard oak. I recruited hubby for some muscle power and he managed to get the broken screws out. We ended up buying different stronger screws and I will cover the heads with black paint. These coat hooks are a great spot for our guys to hang their numerous lumber jackets and work coats. We have a closet in the front entry right beside the front door but the newel post is where their coats end up without these hooks. 


Over a year ago our oldest son Kyle removed the popcorn texture from the ceiling. This was a small and contained area that he was trying for the first time. He has since removed the ceiling texture from the main floor hallway, family and dining rooms. 


He also removed the worn carpeting from the stairs. The upper basement stair treads are a basic pine board and the lower basement stairs are painted pine boards and plywood. We are still deciding how to tackle them.


I painted the walls Cotton Balls White, painted the ceiling and the door to the basement. White works for us because there is no light fixture in this upper basement section and only a single bulb in the lower stair section beyond the door.


I changed the hinges and door handles on the main floor to black. 


I was considering oil rubbed bronze, brushed nickle or pewter but black seems to suit the Shingle-like style of our home. These door levers are from Schlage. Unfortunately black is harder to find and a lot more expensive so I will get to the second floor at a later date.


Kyle spray painted the railing supports and sanded the lower railing. I stained it Early American. We plan to re-stain and paint the railing going upstairs later this year. When we decide on our plans for the stair treads we will pick a matching wood for the landing.


So that is our progress on the upper section so far. I patched the walls on the lower section (from all the hockey bags and furniture going up and down) and will be painting it later. Our home is only 16 years old but it is amazing the wear and tear it gets. 


Oak Buffet and Hutch with Fusion Mineral Paint in Coal Black

$
0
0
Black is one of my favourite colours for painted furniture. This past week I updated this solid oak buffet and hutch with Fusion Mineral Paint in Coal Black.


I had been wanting to try Fusion Mineral Paint. Next Time Around in Cambridge, Ontario sells Fusion and the owner emailed me a picture of a similar cabinet done in Coal Black. She suggested leaving the buffet top, beadboard and shelves in the original oak. 


I also kept the interior of the lower section oak as it is in great condition.


Fusion is supposed to have a very durable finish with no top coat needed so I was able to finish this fairly quickly. I used most of the container of paint probably due to the grain in the solid oak.


This is the before, a very solid piece that we got off a neighbour who had it listed on kijiji online classifieds. It is a great size for smaller spaces.


New hardware was added to update it even more.


I added back a vintage scale and a few ironstone pieces. The kitchen table was moved for better photos but it is back in place now and I will share a few photos tomorrow.


While the black better suits our style, this piece is for sale. I am looking for an industrial style metal shelf unit that is wider and shallower to better fit this small eat in space in our kitchen.
 Have you tried Fusion paint?

Joining these link parties..

Eat In Kitchen Area and A Birthday Milestone

$
0
0
I am sharing some photos of the eat in area of our kitchen today. The buffet and hutch I recently painted with Fusion mineral based paint in Coal Black is not part of my long term plan, but I do like how fresh it looks now.


I would love hardwood floors in our kitchen but since that isn't reality for us right now I have been making changes that I am really loving. When I painted our main floor last year, I carried the Simply White and Revere Pewter through to our kitchen. To me, those colours make all our rooms look better. I really dislike the ceramic tiles I picked out 17 years ago but the neutral paint colours make them look less terra cotta/pink.


I picked up this buffet and hutch with the intention of painting it and then selling it. Now that it is finished, I am just waiting for it to sell. It is a really nice piece but I have plans for more of an industrial open shelving unit. 


The new stained wood shelves really suit my design style and I plan to sand down and re-stain the kitchen table top to match in Early American. I love the mix of white and wood.


I still want to add some barstools to the high counter and stacks of vintage ironstone and collections to the industrial shelf unit when I find or make one. In the meantime this crock filled with rolling pins sits on a little bench in a corner.


The sliding patio doors to our backyard are to the right in this photo. We moved the light fixture up out of the way while I was painting the cabinet and haven't brought it down yet. I hope to replace it one of these days.


Last week was my 50th birthday and on Saturday my sister hosted a large family bbq to celebrate. I thought it was really sweet that my 85 year old Dad (who depends on others for rides now or gets around town in good weather on his motorized scooter) brought me this bouquet of flowers. 

My kitchen is not perfect but I am grateful for our home and I'm really enjoying seeing all the little changes coming together. Next on my list is to change the cabinet knobs. Thanks for visiting today and I hope you have a great week. We have had a really cool week and today there was a mix of hail, graupel, snow flurries and wet snow on and off all day. I want Spring back!!

Sharing this at the following link parties...

Navy and Chevron Outdoor Pillows

$
0
0
It's that time of year where many of us are freshening up our outdoor spaces. Wih tons of pretty patio and porch inspiration on Pinterest and blogs, I have decided on using a navy, white/neutrals and a pop of tuquoise this year.


Today I made some new pillows for the chairs on our front porch. I have been purging and organizing lately, trying to reuse many supplies I already have on hand. Including this navy twill fabric. The chevron ribbon is from Michaels and I just sewed it into a loop. This could easily just be glued or pinned on but I was already at the sewing machine.


I many find a spot for these floral pillows in the backyard. I am still working on outside projects. The concrete needs a power cleaning and I have some accessories and pots of plants to add.


I am enjoying these new pillows though!

I took a bit of an unintentional blog break while I have been working and spending time organizing our home. I'm not finished but it feels good to get rid of stuff, and even better to make money on items we no longer need. I am really looking forward to my summer off from work, just one more month!

I will share more porch photos when I finish (and when it's not raining!)

Rustic Farmhouse Table in ASCP Old White and Provence

$
0
0
Today I am sharing a farmhouse table that I have been working on. I love farmhouse tables. 


First I started out with a base coat of ASCP Provence and then ASCP Old White. I waxed with Annie Sloan soft wax and distressed in just a few places to let the Provence show through.  


The before was part of a two piece open hutch that I picked up for $25. The dated forest green hutch part was damaged around the crown moulding and too short. I didn't like the curved front and flush back of the butcher block so I ended up just using the table base with drawer.


It was easy enough to unscrew the butcher block top and cut some pine planks for a new top. Some sanding, then I used Minwax wood conditioner. Finally I stained them with Minwax Early American, added 3 coats of poly and used the same pocket screws to re-attach the top.


I haven't found the perfect knobs for the drawer so I am using these iron ones for now. We moved the big white office armoire upstairs to my hobby room so I am keeping the table in this spot for now. 


We get soooo much light from the skylights, windows and patio doors in this area of our family room.


The turquoise beads were originally a strand of red wood Christmas beads that I spray painted turquoise. The aqua mason jar holds flowers clipped from our Rose of Sharon bush. 


I think this farmhouse table could easily be used in many different locations in our home. It is the perfect height for a small desk or sofa table.


It perfectly suits the rustic farmhouse / lakehouse vibe I am striving for in our home.

Thanks for stopping in! While I haven't been busy on the blog recently, I have been working behind the scenes organizing and maintaining our home, just nothing overly blog worthy. I am enjoying being off for the summer, spending lots of time with family, and reading into the wee hours of the morning. Later in the week I have a pair of barstools to share that I picked up for $5 and painted. Hope you are enjoying your summer. Hard to believe summer is half way through!

10 Minute Small Patio Table Makeover

$
0
0
Don't you just love quick and inexpensive little updates?! 


We have been working on some projects in our backyard, and while they are not huge changes (removing old brick paver garden edging, re-grouting patio, replacing dog pee-d sod etc.), they are time consuming. A can of black metal spray paint, a $3 find and ten minutes gave me a fresh looking little side table.


Not the best before photo but the little table was a brownish-verdigris coloured metal. The big vintage frame was a curb find and the huge galvanized wash tub was only $5.


We still need to get more seating for our backyard patio since I sold our patio table and chairs but this little table will look nice between a pair of chairs. Black will definitely be an accent colour and possibly my favourite turquoise too. For now we are enjoying a touch of turquoise in this vintage Crown canning jar with rudbeckia from our garden.

In between some summer day trips and lots of reading I am all over the place working on some other projects (stripping and staining our pine basement stairs and some painting projects.) I am back to work in less than a month and trying to squeeze more out of summer vacation. Hope you are enjoying your week and thanks for stopping by!

Viewing all 211 articles
Browse latest View live


Latest Images